The pattern and embroidery design for carry bags was originally published in 1909.
Design for Embroidered Bags
Text reads:
I don’t like to be a bearer of bad tidings to the busy, but if you will turn to the calendar you will see for yourself that, for the embroiderer at least, Christmas is almost here. The number of intervening weeks will seem to fly past on wings of wind to the woman who still anticipates numerous hand made gifts for her friends.
Don’t, if you have time a-plenty and to spare, consider the making of a few little gifts a burden. The feeling they carry with them should be ample reward for whatever time and effort have been spent upon them. Nothing that you can buy in the shop, no matter what its intrinsic value, will go out to your friend or mine weighted with the same message of love as the little thing we’ve made just for her.
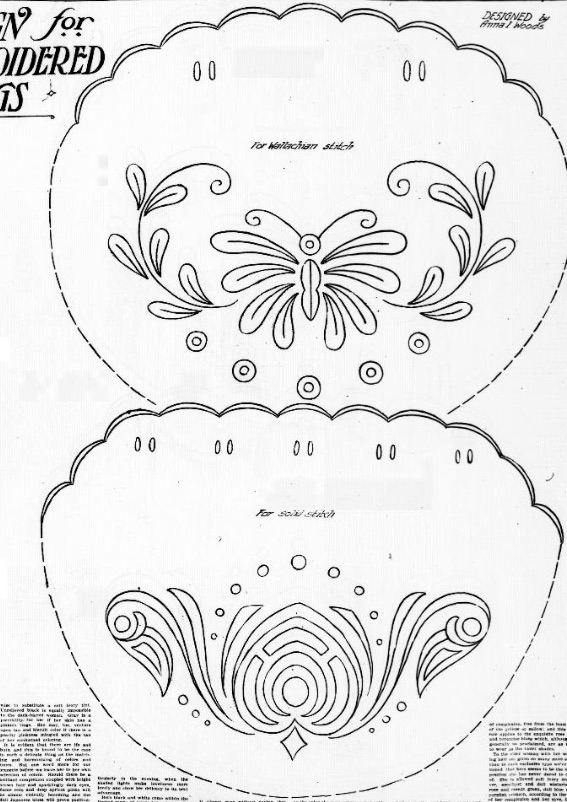
To begin with the butterfly bag: The design should be traced upon a back and front of linen large enough to hold the shape here shown. This is a true wallachian design, and will be found perfect in every detail for that well-known stitch – from the body of the butterfly to its wing portions, and from the leaves to the separate circles below. The single lines alone will require an outline stitch. The small slots are eyelets for the drawstrings – which should be ottoman ribbon – and the scallops are to be worked in the usual way, padded first with soft untwisted cotton.
Care in Cutting
In cutting out the bag you will first cut carefully around each scallop, and you will then allow around the circular outline of the bag a half-inch seam, so that you may, after basting it together with two right sides turned outward, sew it in a very narrow seam, and then turn and seam it again. Where seam and scallop join there should be a few retaining stitches taken.
You may follow the above directions for the second bag, except in doing its embroidery. This design also should be traced upon both sides of the bag. I cannot recommend the paper doll theory in anything except that fascinating toy without a back. This conventional design has been made for solid over-and-over embroidery, and it will look very much handsomer if this idea is adhered to, the portions having first been padded.
In doing this work some thought should be put into it in order that the over-and-over stitches in going around the circular design may slope gracefully toward their common centers. The circles are intended for either eyelet stitch or solid, while the round spot forming the heavy center of the design, and the diamond-shaped spot beneath it, should be worked crosswise from side to side.
These bags are usually made of heavy white linen and embroidered in white, whether intended as shopping bags for the white linen frock or for very dainty and washable fancy work bags. Colored linen however could be used most fascinatingly for the work bags. Can you not see these designs developed in dull blues, greens, browns and even in the richest of cerise reds? I can. In the event of your selecting any of these shades, the ribbon must match the bag, and the embroidery cotton would naturally be a shade lighter or darker. There is a perfect combination of light green linen with black floss and black ribbon, quite too attractive to miss; and again, the design for solid work may be made upon an ecru linen and brought to a perfect harmony in the peacock colors, dull blue and a curious peacock green, by working outward from the gold eye which should, in that case, form the center of the design. A touch of heavy black in the solid spots indicated by the small circles will add just the richness that is needed.
How to Apply the Design
There are two ways to apply this design to the material upon which you wish to work it.
If your material is sheer – such as handkerchief linen, lawn, batiste and the like – the simplest method is to lay the material over the design and, with a well pointed pencil, draw over each line.
If your material is heavy, secure a piece of transfer or impression paper. Lay it, face down, upon this; then draw over each line of the paper design with a hard pencil or the point of a steel knitting needle. Upon lifting the pattern and transfer paper you will find a neat and accurate impression of the design upon your material.
There are two points to observe in this simple process, if you would execute it satisfactorily. One is, see that your material is level – cut and folded by a thread – and that your design is placed upon it evenly at every point.
The second is, when placed accurately, secure the design to the material with thumbtacks or pins so that they cannot slip during the operation.
Transfer paper comes in white, black, blue, red and yellow. I advise the use of the lighter colors when possible, as the black and blue are so liable to crock.
Do not rest your hand or fingers upon any part of the design you are transferring, else the imprint of hand or fingers will be as distinct upon the material as the drawn lines of the design.
Source: Evening star. [volume] (Washington, D.C.), 31 Oct. 1909.