The following instructions and illustrations are for making a signal lantern used for Morse code. the original article was published in 1915.
While the article was written for boys, we here at StrangeAgo feel that the project itself is gender neutral and that this would be an interesting project for adults, as well.
A Signal Lantern
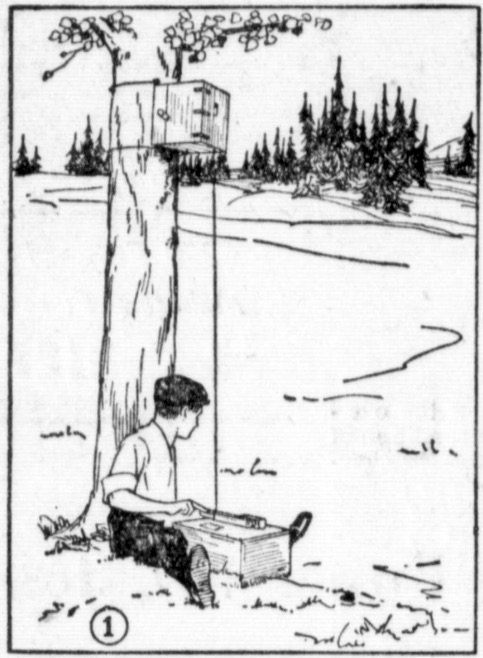
You boys can easily communicate with one another after dark by means of homemade signal lanterns similar to that shown in Fig. 1.
You will need a small box for the lantern. The dimensions are not important, but ten or twelve inches is about right for the depth, width and length. Fig. 2 shows the completed lantern, and Fig. 3 shows the box before the door has been put on.
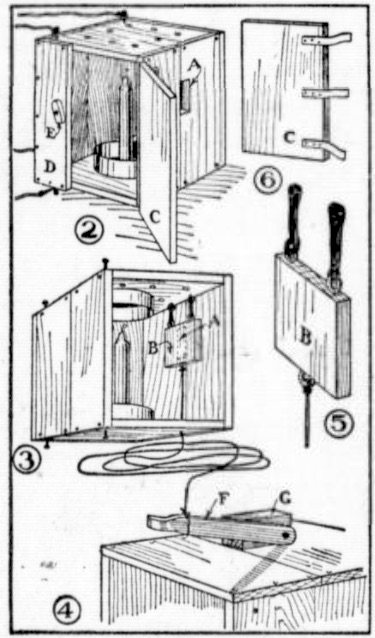
One side of the box becomes the front of the lantern. In the center of the width of the front, a little above the center of the height, cut a slot one inch wide and three inches long, through which to flash the lantern light (A, Figs. 2 and 3); and make a shutter block (B, Figs. 3 and 5) by which to regulate the lengths of the flashes. Screw a couple of screw-eyes into the top edge of the shutter, and a third screw-eye into the center of the bottom edge; and loop a heavy rubber band through the upper pair of eyes, and tie a strong cord to the lower eye (Fig. 5). Then tie the free ends of the rubber bands to a pair of screw-eyes screwed into the under side of the lantern top, in the right positions to come directly over the pair in the shutter when it is place over slot A; and bore a hole through the bottom of the box for the cord attached to the shutter to pass through (Fig. 3). Then, by pulling the cord, the shutter can be opened so light will pass out of a small portion of the slot, for a “dot” of the code, or all the way open, for a “dash” of the code.
The lantern may be lighted either by a candle or a bicycle lamp. If you use a candle, tack a can cover to the lantern bottom for a holder, and tack another to the top to protect the wood from the candle flame. Bore holes through the top for ventilators.
The cover board C (Figs. 2 and 6) is hinged with three strips of leather or tape. Strip D (Fig. 2) provides a place for attaching the wooden button E.
The lantern is now ready for signaling.
The operating key is shown in Figs. 1 and 4. Cut it about eight inches long and of the shape of F (Fig. 4); then nail a block G to a box (Fig. 4), and screw the end of the key to this block. Tie the operating cord to the key, allowing just enough length of cord to operate the shutter properly.
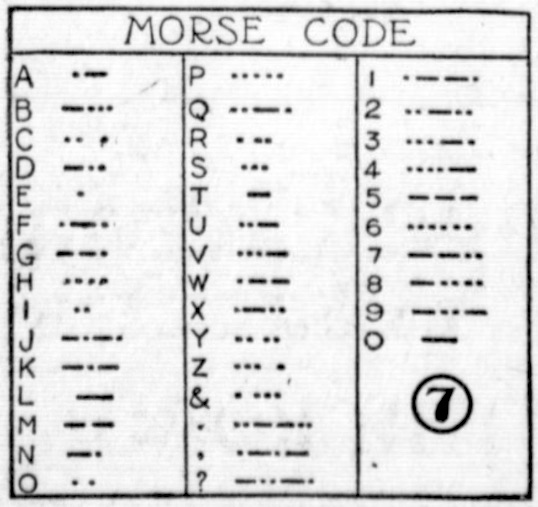
Fig. 7 shows the Morse alphabet code. Cut out and paste this diagram upon a piece of cardboard, and tack the cardboard to the box on which the key is mounted so the code will always be before you. Practice will enable you to memorize it. [Wood burning the Morse alphabet to the box would be a more permanent way to keep a copy of the code.]
Source: The Yale expositor. (Yale, St. Clair County, Mich.), 02 Dec. 1915.