
Have you ever wanted to build a tree club house? So have we, and some of us remember the dinky, unsafe club houses our parents put together for us. The instructions below were originally published in 1913.
A Tree Club House
Every boy at one time or another builds a shanty in the back yard or a nearby back lot, and where one or more trees are available preference is generally given to a tree hut. Not only does a location among the tree branches appeal to the romantic side of the young builder’s nature, but recognizing the fact that once the ladder leading to the entrance has been removed and hidden, the hut is inaccessible to passers-by, there is a feeling of security in knowing that neither unfriendly boys nor tramps can disturb it.
The construction of the aerial foundation for a tree hut is the most important part of the work. This of course must be very carefully planned and securely put together. Its form will depend largely upon the size of the hut, but principally upon whether one, two or three trees are used for supports. Where two or three trees are close enough together, it is advantageous to build the hut between them; again, a most satisfactory plan is to construct the hut in the crotch of a large tree, or to build it around the tree, extending brackets from the trunk to all four sides of the platform.

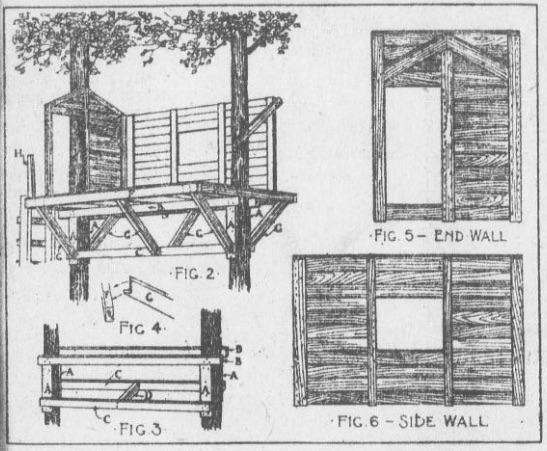
The tree club house illustrated in fig. 1 has been designed with a two-tree foundation, as this is the simplest kind to build. Fig. 2 shows a large detail diagram of the foundation framework, and fig. 3 the first steps in its construction. If possible to get them, use 2x4s for the framework; otherwise, nail together two pieces of 4-inch board for each member.
First of all, construct your ladder, splicing together pieces of 2×4 for the side rails, and nailing 1×2-inch strips across them for rungs.
The four pieces of board, A (fig. 3), should be 8 or 10 inches wide and 3 feet long, and should be spiked to opposite sides of the trees with their tops on an exact level with one another. then the horizontal pieces B should be set upon the tops of these and be spiked to the trees, and the pieces C spiked to the bracket blocks A near their lower ends. Cut and fasten the block D between pieces C.
The floor joists should be laid on top of horizontal pieces B. One of these should be fastened outside of each tree, one inside of each tree, and one or two in the space between. Then pieces F should be spiked to their ends (fig. 2).
The struts G should be cut of the right length to reach from pieces E to C, and should have notches cut in their ends for these pieces to fit in (fig. 4). When these have been securely spiked in place, cut the floor boards and nail them to the joists.
It is easiest to construct the walls of the tree hut in sections, building them on the ground, and then hoisting them into position by means of a rope thrown up over an upper limb of one of the tree supports. Figs. 5 and 6 show how the wall sections should be built up. As you will see by these diagrams, the ends of the boards are nailed to board battens; also, that where there is to be a window an extra batten must be placed each side of the opening to nail the boards to. Lay the battens flat upon the ground, at the proper distances apart, connect them temporarily with horizontal strips at top and bottom, and after checking up to see that they are exactly parallel, and that their corners are square, turn the frame over and nail the side boards to the other side. In the case of the end walls, build them up square as shown (fig. 5); then fit in pieces at the proper angles for the pitch of the roof, and saw off the corners on a line with them. The bottom board of the end section in which the doorway is made should be extended across the opening for a brace (fig. 5), and be sawed off after the wall has been fastened in place. Use nails long enough to extend through the boards and battens, and clinch them upon the inner face of the battens.
The two end walls can be set up in position first, and nailed to the end tree supports; then the side walls can be set up and fastened to them; or one end wall can be set up, then a side wall, then the second end wall, and then the second side wall.
Fig. 1 shows how to put on the roof boards, by fastening first one layer in place, about 1-1/2 inches apart, and then lapping another layer of boards over the spaces between the first layer. If you can get some roofing paper you will find it easier to make a tight roof. This can be tacked to a layer of boards spaced several inches apart.
The window opening can be made of the right size for an old window sash; but if you cannot find a sash, a wooden shutter can be used for closing up the opening.
Batten together several boards at top and bottom for the door, and fit a diagonal brace between the battens. Hinge the door in place with the diagonal running in the direction shown in fig. 1. This is the proper direction for the brace, to keep the door from sagging.
The post H (fig. 2) should be fastened at the edge of the platform so you will have something to steady yourself by in descending and ascending.
Source: The Southern herald. (Liberty, Miss.), 14 Feb. 1913.
