The instructions below show how to make rustic doll furniture. the original article was published in 1920, but many modern adaptations to the methods described can be used. For example, a glue gun can be used to hold the twigs together.

Rustic Toys Made With Twigs
Rustic doll furniture will enable you to fix up a small plat of ground for your dolls.
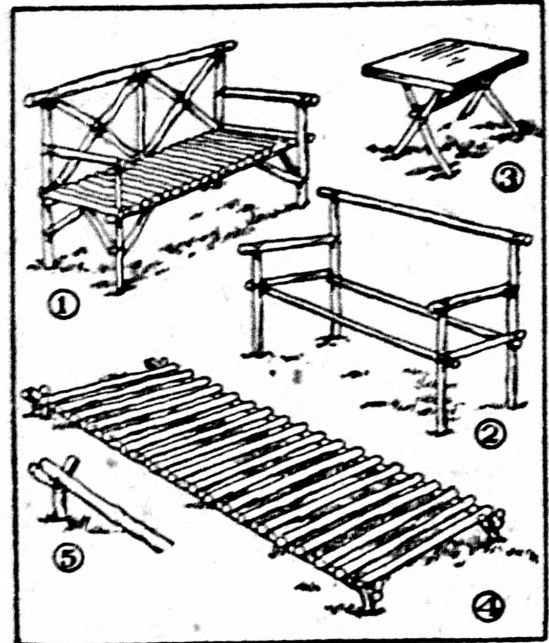
The bench in Fig. 1 has a framework built as shown in Fig. 2. The illustrations show the relative proportions of the pieces it requires. Use small brads for fastening together the twigs, and be careful not to split the slender pieces when driving these. Connections can be strengthened by wrapping thread around them as shown. After completing the framework (Fig. 2), fasten the diagonal leg braces in place, also the vertical and diagonal members of the seat back; then cut the seat crosspieces and glue them to the framework.

The table in Fig. 3 requires two end frames built up of twigs crossed, with horizontal connecting pieces extending from the crotch of one frame to that of the other. Cut the table top out of cigar box or berry box wood, and make four holes for the legs.
The cot in Fig. 4 is excellent for a doll’s tent. Fig. 5 shows you how a crotched twig supports the side poles.

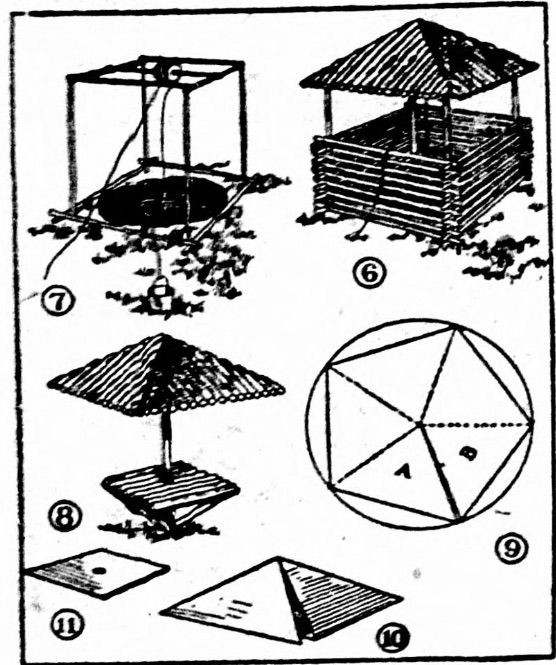
The well has a rustic curb and roof built as shown in Figs. 6 and 7. The curb sets over a hole five or six inches deep. Build the curb of twigs laid log-cabin fashion, to about the center of the corner posts, and fasten the crossed ends to the posts with thread. Fig. 9 shows a pattern for cutting the cardboard roof. First describe a circle, then divide its circumference into five parts, and connect the points with one another and with the center, as shown. Cut out the piece, and cut along the line between parts A and B, then fold along the dotted lines, lapping part A over B so as to form the four-sided hip roof shown in Fig. 10. Fasten the cardboard roof to the top of the framework; then cut and fasten a covering of twigs to it so as to completely cover the cardboard. A thimble or any small article may be used for the well bucket. Fig. 7 shows how to arrange a spool pulley then how to run a cord from the bucket up and over the pulley.
The seat with a canopy (Fig. 8) has a cardboard roof like that of the well, mounted upon a center post, and the seat has a cardboard foundation like that shown in Fig. 11, supported beneath by diagonals run from the corners to the central post. Cover the seat with short twigs.
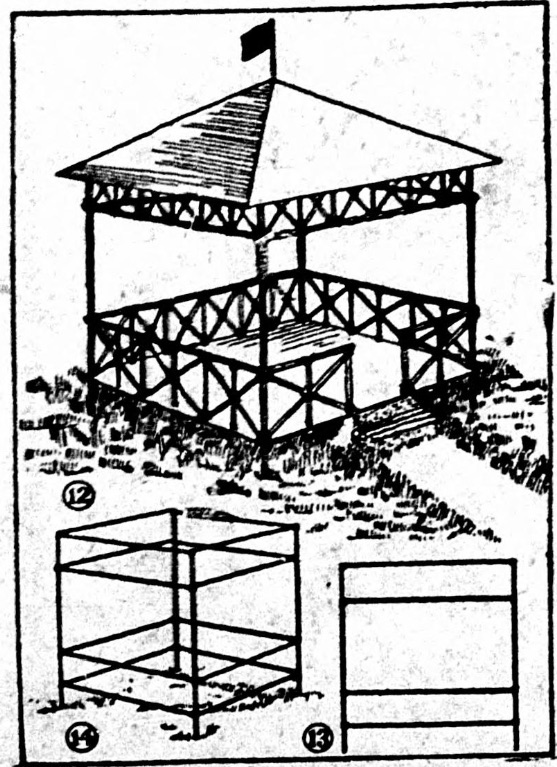
The summer house in Fig. 12 is constructed similar to the framework of the well curb and roof, but is larger.
Source: The bystander. (Des Moines, Iowa), 16 Dec. 1920.

