

Long before televisions hummed in living rooms or smartphones glowed in children’s hands, amusement was often built at the kitchen table with scraps of wood, old clock parts, cardboard, and imagination.
Newspapers regularly published do-it-yourself projects meant to entertain, educate, and encourage creativity, especially among young readers eager to turn ordinary household objects into toys and curiosities.
The following article, published in the Vilas County News of Eagle River on August 13, 1913, captures that spirit perfectly. Rather than purchasing toys from a store, readers were shown how to craft their own spinning tops from discarded clockwork wheels, upholstery tacks, spools, pencils, and cardboard. Some of the designs were simple enough to make in minutes, while others required patience, ingenuity, and a touch of artistry.
More than a century later, these homemade tops offer a fascinating glimpse into a time when entertainment was slower, hands-on, and deeply inventive.
Homemade Tops
Whip-tops and peg-tops of several varieties can be purchased at the corner candy store, but the kind I am going to show you how to make cannot be bought.
A splendid spinner can be made of the little balance wheel of an old set of clockwork (Fig. 1). This little wheel is so accurately made that it will spin very steadily, and as the ends of its pivot are pointed, it remains in one spot while spinning. One of these wheels will spin from a minute and a half to 2 minutes.
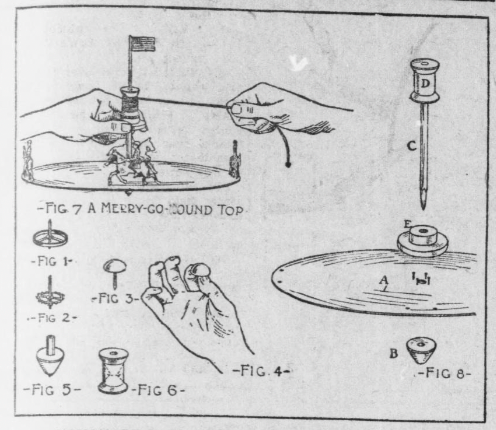
The toothed wheel shown in Fig. 2, or any of the other forms of clock wheels, will make good spinners, but unless you file their pivot ends to points they will not spin in one spot but will glide over the table top in spirals. This decreases the length of time which they will spin, but makes the tops nonetheless interesting. Great fun may be had spinning these around the balance-wheel top, while the latter is spinning.
A large upholstering tack or a rug tack (Fig. 3) is a good spinner. While the clockwork wheels are spun by twirling them by means of the upper end of the pivots, the tack is spun by holding the spinning point between the thumb and first finger, as shown in Fig. 4, then giving it a quick turn and dropping it upon a table.
The tack top is an eccentric spinner. First it hops about in a very lively fashion; then when you think it is about through spinning it gains its balance and for some seconds spins quite as steadily as the clockwork balance-wheel top. The tack top can be spun upon its head as well as upon its point.
The top in Fig. 5 is made of a half of a spool and a short piece of lead pencil. Saw a spool into halves and then taper one half from its beveled end to the center. Sharpen the pencil to a point, and push it through the spool until its point projects just a trifle.

The merry-go-round shown in Fig. 7 is a new top idea, and it is not hard to make. You will require a cardboard disk 12 inches in diameter, which can be cut from the cover of a large cardboard box, three spools, a pencil, and some lightweight cardboard for the making of the horses and riders. Fig. 8 shows the details. Tack the center of the disk platform (A, Fig. 8) to a spool top (B). Then glue the square end of the pencil (C) in the hole of a spool (D), and slip the pointed end through the flange end of a large spool (E) and down through the disk into B.
Coat the pointed end with glue so it will stick fast in B. The hole in E must be enough larger than the pencil so it will turn freely. The spool end shown is cut from a large ribbon spool.
When you have made this much of the top, you can spin it to see how it works. Wrap the spinning cord — use a strong lightweight wrapping twine — about spool D, in the same manner that you wind the cord of any top; then holding spool E with the left hand (Fig. 7), pull steadily upon the cord with the right hand until all is unwound, and gently drop the top upon its spinning point.
To get the best results from the top, the cardboard used for the disk platform must be very straight. If it warps out of shape, flatten it by pressing it under a pile of books.
Pictures of horses can be cut out of magazines and mounted upon cardboard for the merry-go-round, but it you wish to try your hand at making them yourself, you will find it an easy matter to enlarge the pattern shown in Fig. 9. In this diagram, each square represents 14 inch. Mark out a similar set of squares, ruling the lines exactly 1/4 inch apart, then with the small and large sets of squares to guide, you reproduce the outline exactly as shown.
With one horse made, the others can be traced from it. Fig. 10 shows how two burnt matches or toothpicks are lashed to the legs of the horse for supports, and Fig. 8 shows how holes are pierced through the disk platform to stick them into.
Mount a small flag upon the top of spool D and your merry-go-round top will be completed.
Source: Vilas County News. Eagle River, Vilas County, Wis. August 13, 1913.
You can find Neely Hall’s book, Handicrafts for Handy Boys, on Amazon. (Linked)
