
Parents and kids of the past often built their own entertainment, such as this wagon with a sail, called a sail wagon. It looks dangerous and probably caused a lot of broken bones at the time, but it is still neat to see what our recent ancestors came up with.
The article below was originally published in 1913.
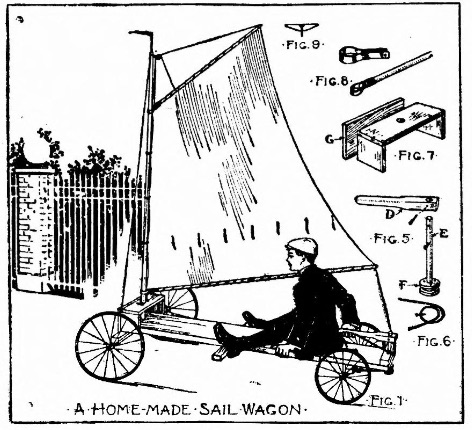
A Sail Wagon
When the ice has broken up, and while the lakes, ponds, and streams are sluggish and unfit for either boating or ice yachting, there remains the homemade land yacht for the boy whose hobby is sailing, to tide over the time until he can make use of his sailing canoe or sailboat. And for the boy who doesn’t have an opportunity to sail a boat, the land yacht is a fair substitute and will afford him and his companions an unlimited about of fun, coasting along the streets and other vacant property.
A sail wagon can be quickly made, as its construction differs by slightly from that of a simple coasting wagon. The sail wagon illustrated in Fig. 1 is streeted from the rear, just as the rudder of a boat is controlled. This makes it necessary to turn the wagon around rear end to, so the solidly fastened pair of wheels will be at the bow and the pivotal pair of wheels at the stern.
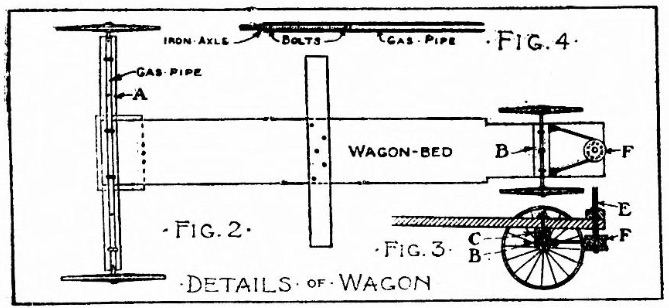
Get a pair of planks 2 inches thick, 10 or 12 inches wide, and about 8 feet long for the wagon bed, and two pair of wagon, velocipede, or baby carriage wheels, for the wheels. Fig. 2 shows a plan view of the under side of the wagon bed with the wheels in place. The wheels at the bow have a spread of 4 feet, to give the wagon sufficient stability, which will make it necessary to procure a long axle for these wheels. If you have the axle that belongs to the wheels, buy a 4-foot length of gas pipe, and take it and the axle to a blacksmith or machinist. Have him cut the iron axle into halves, slip one half into each end of the piece of gas pipe as shown in Fig. 4, and rivet or bolt them in place. Cutting the axle and drilling and riveting the halves to the gas pipe will cost no more than 25 cents. With staples fasten the gas pipe axle to a 2×4 axle (A, Fig. 2), and screw or nail this wooden axle to the wagon bed at the extreme bow end.
The stern wheels require a 2×4 axle (B, Figs. 2 and 3), and a cross piece, C, of the same size (Fig. 3). Nail cross piece, C, to the wagon bed 12 inches from its stern end. Then bore a five-eighths inch hole through the center of the length of axle, B, and another through the center of cross piece, C, and the wagon bed, and bolt the axle to the wagon bed with a five-eighths inch bolt. Fasten the iron axle to the wooden axle with staples.
The details for the tiller stick, tiller post, and connections are shown in Fig. 5. Whittle one end of the tiller stick (D) round for a handle, and bore a hole through it near the other end for the post (E), which may be a piece of broom handle. Make the three wooden disks which form the spool (F) out of hard wood, fasten them together and screw to the lower end of post, E. Nail a cross piece to the top of the stern end of the wagon bed, as shown in Fig. 1, and then bore a hole through this and the wagon bed large enough to stick the tiller post through. Slip the post far enough into the hole so spool, F, will be on a level with the wheel axle, and drive an iron pin through a hole in the post to keep it from dropping further, as shown. Fasten the tiller stick to the top of the post with another pin.
Get some strong manila rope for tiller lines, loop it as shown in figure 6, slip the loops over the spool on the tiller post, and tie its ends to a couple of screw-eyes screwed into the wooden axle. Drive a nail through one side of the loop, as in Fig. 6 and into the spool to keep the rope from slipping. If the plank of the wagon bed is as wide as the iron axle, it will be necessary to saw away a strip on each side edge, as shown in Fig. 1, so the wheels can turn. This will not permit of making shape turns, of course, but if you want to you can mount the wheels on a deep axle that will permit the wheels to turn under the wagon bed.
Fig. 7 shows the bench support for the mast. Make this about 8 inches high and 8 inches wide, and after nailing it to the wagon bed plank, cut and nail the board, G, to its front edge for a brace.
A rug pole makes an excellent mast for a sail wagon, but lacking this, cut a pole about 2 inches in diameter and 8 feet long. Bore a hole through the center of the bench and another through the wagon bed plank to receive the bottom of the mast. The lower hole should be a trifle forward of the upper hole to give a slight rake to the mast. Brace the mast with rope shrouds fastened to its top and to screw-eyes at each end of the mast bench.
A cat-boat rig is shown upon the sail wagon illustrated, but another form of sail may be substituted if you wish. The boom for the cat-boat rig should be about 8 feet long, and the gaff, or top pole, about 5 feet long. Curtain poles will serve excellently for these if you can procure them. The mast end of each should have a loop of strap-iron fastened to it with screws and wires, as in Fig. 8, to fit over the mast. Unbleached muslin is good material for the sail. Make this 5 feet along the luff, or edge along the mast, 9 feet long on the leach, or outer edge, and the respective lengths of the gaff and boom along the head and foot. Curtain pole rings or loops of heavy wire will make satisfactory rings, a clothesline pulley will do for a block for the mast top, and a lightweight rope should be used for sheets and halyards. Cleats on which to fasten these ropes may be made as shown in Fig. 9.
Source: The Virginia enterprise. (Virginia, St. Louis County, Minn.), 07 Feb. 1913.
