Water makes a fun activity for kids and back in the early 1900s, the toy water motor kept kids busy for hours. Maybe it was because they could mess with the water, but also because they could actually build something with parts that moved.
The instructions below were originally published in 1913.

A Toy Water Motor
The toy water motor shown in the illustrations may be operated in a bathtub or a kitchen sink, but a laundry tub will generally be the most satisfactory place because down in the laundry you will have more room in which to rig up the toys that you wish to run, and at the same time you will not be in anybody’s way.
Aside from operating toys with a water motor, the writer and his friends used to have a great deal of fun rigging up a dozen or more wheels of different sizes and belting one to another with belts of clothesline and heavy cord in such a way as to have them running at various speeds. Spools, clothesline pulleys, bicycle wheels, sewing machine wheels, and homemade wooden pulley wheels were used, and when all were set in motion they produced as much noise as is made in a small power plant – which to us was one of the fascinating features of the scheme.
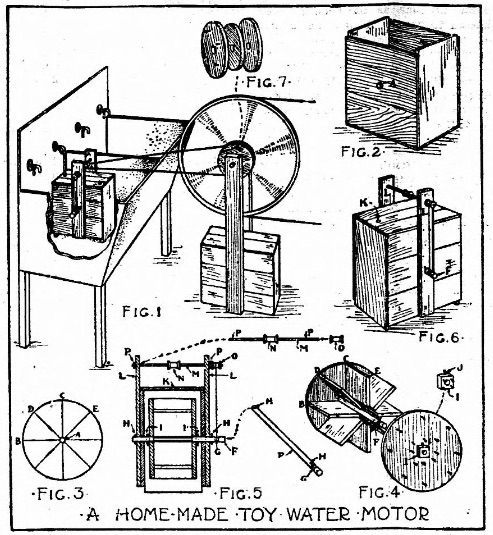
You can probably get a small grocery box for the case of your water motor; if not, it will be a simple matter to cut down a box. A narrow strip should be removed from the top board of each side of the box, as shown in fig. 3, or else a small strip should be nailed to the top edge of each side board, to form outlets for the waste water. (Fig. 6.)
Figs. 3 and 4 show the details for the water wheel. The diameter of this should be several inches shorter than the height of the box. After cutting out the two circular side pieces of the wheel, and boring a center hole through each large enough for a broom handle or curtain pole shaft (A, Fig. 3), draw the lines B and C at right angles to one another, and lines D and E at 45 degrees to these. The lines represent the centers of the paddles of the wheels and will be your guides in putting the wheel together. First nail one end piece to each paddle (Fig. 4), then nail on the other end piece.
The shaft F should be enough longer than the width of the motor case to allow for cutting a pulley (G) on one end and driving a pin (H) through the other end (Fig. 5). To prepare the pulley, first make two cuts entirely around the shaft with a fine saw, then remove the wood between the cuts with a chisel. This cutting must be done very exactly, of course, or your pulley will not center on the shaft. Drill the holes H for pins. Block I (Fig. 4) is for a set-screw to keep the motor wheel from turning on the shaft. Make one of these for each end of the wheel. Bore hole A through the center of the block, drive screw J into one edge, and then nail the blocks to the ends of the wheel. To mount the wheel, first slip it into the case, then slip the shaft through holes A, and when properly centered drive the set-screws J part way into the shaft.
Bore the hole K through the top of the motor case, about one inch inside of the line of the forward part of the wheel. This hole should be just the size of the faucet from which you are going to obtain your water power, and one end of a piece of rubber tubing should be slipped into it and the other end cut off so it will be of just the right length to reach the faucet. This will prevent the water from splashing.
The uprights L and the upper shafting M are necessary only in case the water motor sets down in a tub and the toy to be operated cannot be belted directly to the pulley on the main shaft. The upper shafting can be placed high enough so that the belt will clear the sides of the tub (Fig. 1). Cut the shaft M large enough to fit snugly in the holes in spools N and O, and drill the holes P for pins.
Fig. 7 shows how you can prepare wooden pulley wheels for gearing down or increasing the speed of your motor, and Fig. 1 suggests how one of these may be fastened to the side of a bicycle wheel and the two supported on two uprights nailed to a box case.
Source: The Virginia enterprise. (Virginia, St. Louis County, Minn.), 11 April 1913.

