

Have you ever wanted to build a bluebird house for the birds out back? These instructions for a bird house were originally published in 1921 and show you the basics of making a birdhouse for your feathered friends.
A Bluebird House
Bluebirds require houses of larger proportions than do wrens, and larger doorways. The floor space must be at least 5 inches square, the doorway1-1/2 inches in diameter. Provide these essential details, hang the house at a height of about 10 feet where it will be safe from unwelcome intruders.
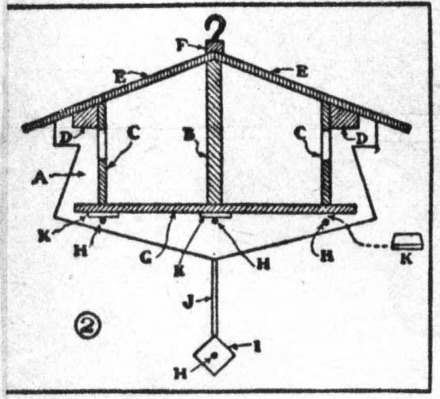
In the cross section of fig. 2 I have lettered each piece required, and in figs. 3 to 6 I have shown the patterns. End pieces A and center partition B should be cut out of material 7/8-inch thick, the other pieces may be cut out of box boards 3/8-inch thick. Prepare the end pieces first. If you will draw a center line, then upon one side of this line draw one-half of the end, you can take a piece of thin paper, make a tracing of the other half, and transfer it upon the other side of the center line to complete the end. By doing this, you will find it easy to get both sides alike. Fasten together two pieces of board with several nails driven part way in, draw the outline of the end piece upon one board, and saw out the two pieces at one time. Then, before separating the pieces, plane up their edges. With ends A prepared, cut out center partition B, side walls C, roof holding D, roof boards E, ridge piece F, and floor G.
If you haven’t an expansive bit the can be adjusted to cut a hole 1-1/2 inch in diameter, bore several small holes in side walls C, and cut out the wood between to make a 1-1/2 inch opening. The tops of walls C must be beveled to correspond with the pitch of the roof, as must also the top of molding strips D. Ridge piece F must be grooved to fit over the roof ridge, as incited in figs. 2 and 5.
In assembling the house, first fasten partition B between ends A, then nail holding strips D to side walls C, and fasten walls C between ends A. Care must be taken to get the end pieces exactly opposite, else the entire structure will be lopsided. Next, fasten roof boards E in place, being careful to get the end projections equal. With the roof nailed on, fasten ridge piece F to it.
The floor is made removable so that the compartments will be accessible for the annual house cleaning. The floor board slides in between ends A, above perch sticks H, and is held in position by nine wooden wedges (K, fig. 2) wedged in between it and the perch sticks. Bore 1/4-inch holes through ends A, about 3/4-inch below the floor, to receive perch sticks H, fig. 6 shows the length of perch sticks H; dowel sticks may be used.
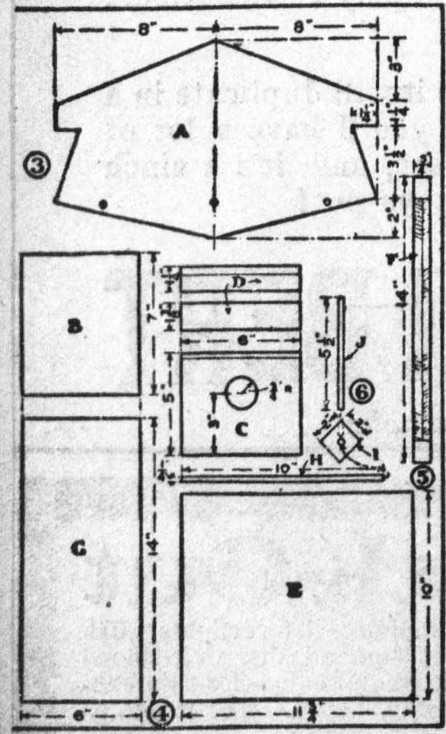
The bottom perch stick H runs through a pair of blocks I cut to the dimensions shown in fig.6, and hangers J (fig. 6) run into holes bored through the corners of blocks I, and into holes bored in the center of the bottom edge of ends A (fig. 2). Fasten the pieces with brads.
If you have done the work as directed, your bluebird house requires only a couple of coats of paint and a pair of hooks screwed into the ridge.
Source: The Neshoba Democrat. (Philadelphia, Miss.), 28 July 1921.
