

The instructions below were originally published in 1921 for making a bird house for martins.
A Martin House
The roof is built in sections so that it may be separate for cleaning out the compartments (figs. 3 and 4). The house is 24 inches wide, 30 inches long and 35 inches high.
First construct the frame which forms the first story walls, out of boards 4 inches wide (A and B, fig. 3), then the second story out of 8 inch boards (C and D, fig. 3), and then the third story frame out of 8 inch boards (E and F, fig. 3). Cut boards A, C and E 28 inches long, and boards B, D and F 24 inches long.

Cut the doorways before nailing the frames together, but as these should come in the centers of the compartments first mark off the positions of the partitions upon the boards. The first story diagram shows how two long partitions (G) and six short partitions (H) are set. There will be one round doorway in boards A, and three in boards B. For martins these openings must be two and one-half inches in diameter. Bore several small holes and connect them into one large hole with a chisel. There is one square doorway in boards C and E, and three in boards D and F, two inches wide and three inches high. After marking them out bore holes in the corners and cut from one hole to another with a small saw.
After cutting the doorways and nailing together the frames, cut and fasten the partitions in place. Then prepare floor boards I to fit the first story frame, floor boards J to form a three-inch projection upon all sides of the second story frame, floor boards K to form a two inch projection upon all sides of the third story, and floor boards L to fit the third story frame. A hole must be cut through the exact center of floors I, J and K for the post support V (fig. 2) which extends through the first and second stories. Nail floor boards I, J and K to the under side of the first, second and third story frames. These sections need not be fastened to one another, because the support will tie them together when they are slipped over it.
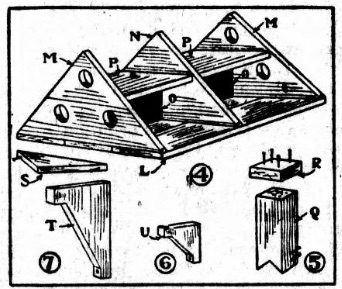
Cut gable ends M and partition N (fig. 3) out of 12-inch boards, making the angle at 45 degrees, and bore three two and one-half inch doorways through ends M. Nail floor boards L to the bottoms of these pieces (fig. 4), then fasten partitions O (4 inches wide) between M and partition N, and fasten floors P on top. Screw floor L to the third story walls E.
Cut roof boards long enough to project six inches over the gable ends and side walls, fasten these together in two sections with battens, and screw to the gable ends. Nail the small shelf S (fig. 4) to the top floor below the gable ends.
Fig. 5 shows the chimney (Q) and its cap (R), fig. 6 the small brackets U which fasten below shelves S and floor K, and fig. 7 the brackets T which fasten below floor J.
The bird house support (V, fig. 2) is a 2×4. Cut brackets W out of two-inch stuff and spike them to V, then nail the 1×2 inch strips X to the wide faces of V, below the brackets, so as to make the post of the same form on all sides.
Source: The Bottineau courant. (Bottineau, Bottineau County, N.D.), 15 Sept. 1921.
