
Bread bakers and home cooks will find a plain, well made bread board invaluable in the kitchen. The instructions for making one were originally published back in 1919.
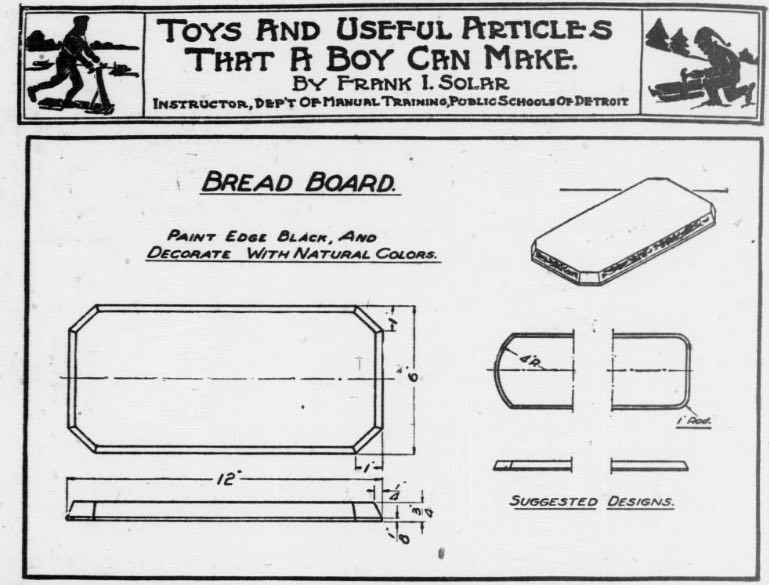
Bread Board
Never has there been such a call upon people to save foodstuffs as there is now. Our country will have to supply food for many people across the water for sometime yet, and to be able to do so, we must save very carefully of what we have for our own use.
Bread has often been called the staff of life. It certainly is now. Mr. Hoover has asked that people make use of the bread board. Where bread is cut in the kitchen and brought to the table, it is difficult to tell how much to cut, with the result that often there are several slices left over. These dry out quickly and are usually thrown away, as no one wishes to eat dry bread. If the bread is placed directly on the dining table, it can be cut as needed and no waste occurs. It is for this reason that the request to use the bread board has been made.
The best material to use is maple, as it is hard and will offer more resistance to the knife than most woods. The wood is bound to be cut slightly each time the board is used, so a hard wood is the best. Maple is a close grained wood, which is also an advantage.
Get out the stock to dimensions in the usual way. Select the design that best pleases you. Three suggestions are offered herewith, though the board may be worked up with a circular or an oval shape if desired. Those shown have proven very satisfactory, as they conform to the shape of the average loaf of bread. Of course, there are no hard and fast rules governing these. The dimensions may also be changed to suit, the most important part being that you observe the suggestions regarding the decoration – proper space allowance, etc.
Whatever design is selected, be very careful that you have your work accurate. For instance, in the design having the corners cut off, be sure the chamfers meet uniformly all around. Note that the chamfer is made quite deep with reference to the thickness of the board. A small chamfer would allow but a small decorative space and the result would not be effective. This is important to remember if you decide to use different designs than the ones presented.
Having the board nicely to shape and well sanded, the decoration is next in order. Of course the top is to be left the natural condition of the wood – only the edge and the chamfer are to receive treatment. First paint the edge and the chamfer in whatever color is desired. Black or blue is suggested. Two coats will likely be necessary. When dry, apply your design to the chamfer as shown in the sketch. This can be done by stencil or free hand, using colors that harmonize with the body coat.
It is suggested that a piece of soft cloth be fastened to the bottom of the board. The bread knife is, of course, an important part and should have the handle painted and decorated to match the board.
Source: Rock Island Argus. (Rock Island, Ill.), 18 Jan. 1919.
