
While in the 1950s style, this summer handbag would be great for days at the park, beach, and for everyday window shopping.
Unfortunately, the words are difficult to read in the image so I’ve typed in the instructions for you.
Pattern and instructions were originally published in The Australian Women’s Weekly, January 9, 1957.
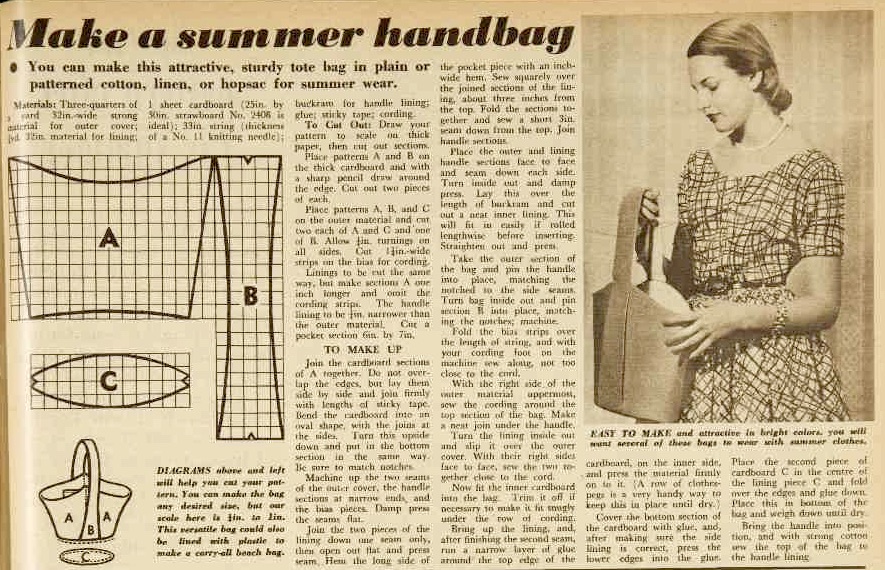
Make a summer handbag
You can make this attractive, sturdy tote bag in plain or patterned cotton, linen, or hopsac for summer wear.
Materials:
- Three-quarters of a yard 32 in.-wide strong material for outer cover;
- 1 yd – 32 in. material for lining
- 1 sheet cardboard (25 in. by 30 in. strawboard No. 2408 is ideal)
- 33 in. string (thickness of a No. 11 knitting needle)
- buckram for handle lining
- glue
- sticky tape
- cording
To Cut Out
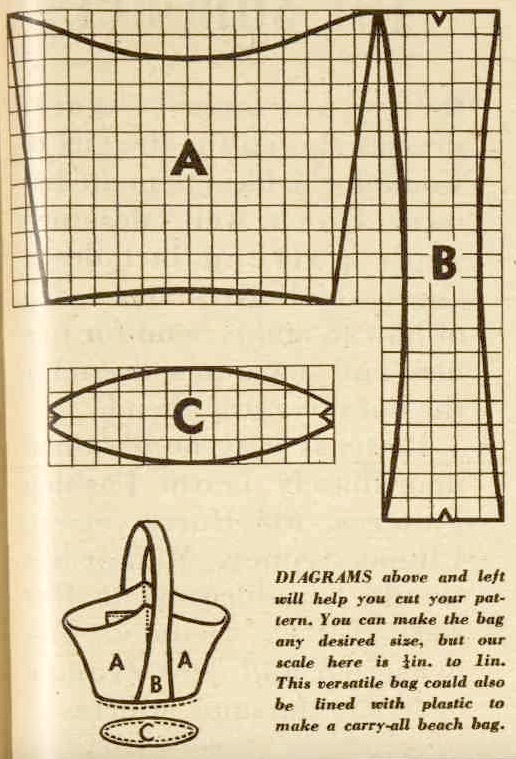
Draw your pattern to scale on thick paper, then cut out sections.
Place patterns A and B on the thick cardboard and with a sharp pencil draw around the edge. Cut out two pieces of each.
Place patterns A, B, and C on the outer material and cut two each of A and C and one of B. Allow 1/4 in. turnings on all sides. Cut 1-1/4 in. wide strips on the bias for cording.
Linings to be cut the same way, but make sections A one inch longer and omit the cording strips. The handle lining to be 1/4 in. narrower than the outer material. Cut a pocket section 6 in. by 7 in.
To Make Up
Join the cardboard sections of A together. Do not overlap the edges, but lay them side by side and join firmly with lengths of sticky tape. Bend the cardboard into an oval shape, with the joins at the sides. Turn this upside down and put in the bottom section in the same way. Be sure to match notches.
Machine up the two seams of the outer cover, the handle sections at narrow ends, and the bias pieces. Damp press the seams flat.
Join the two pieces of the lining down one seam only, then open out flat and press seam. Hem the long side of the pocket piece with an inch wide hem. Sew squarely over the joined sections of the lining, about three inches from the top. Fold the sections together and sew a short 3 in. seam down from the top. Join handle sections.
Place the outer and lining handle sections face to face and seam down each side. Turn inside out and damp press. Lay this over the length of buckram and cut out a neat inner lining. This will fit in easily if rolled lengthwise before inserting. Straighten out and press.
Take the outer section of the bag and pin the handle into place, matching the notched to the side seams. Turn bag inside out and pin section B into place, matching the notches; machine.
Fold the bias strips over the length of string, and with your cording foot on the machine sew along, not too close to the cord.
With the right side of the outer material uppermost, sew the cording around the top section of the bag. Make a neat join under the handle.
Turn the lining inside out and slip it over the outer cover. With their right sides face to face, sew the two together close to the cord.
Now fit the inner cardboard into the bag. Trim it off if necessary to make it fit snugly under the row of cording.
Bring up the lining, and, after finishing the second seam, run a narrow layer of glue around the top edge of the cardboard, on the inner side, and press the material firmly on to it. (A row of clothes pegs is a very handy way to keep this in place until dry.)
Cover the bottom section of the cardboard with glue, and, after making sure the side lining is correct, press the lower edges into the glue.
Place the second piece of cardboard C in the centre of the lining piece C and fold over the edges and glue down. Place this in bottom of the bag and weigh down until dry. Bring the handle into position, and with strong cotton sew the top of the bag to the handle lining.
