
My grandfather would make miniature furniture for my sister and I when we were small (over 40 years ago). The plans he would use were similar to the small desk plans below.
Small furniture is a treasure because we still have ours and have allowed our children to play with the pieces. The small desks, tables, and miniature hutch will continue to be passed down through the family for generations to come.
Child’s Desk
If the “Handy Boy” has a little sister he may be sure a desk suited to her size and age will be given a high place among her dearest possessions. If he has studied, or better still, if he has made similar projects which have appeared in this series he should have no trouble in making this desk.
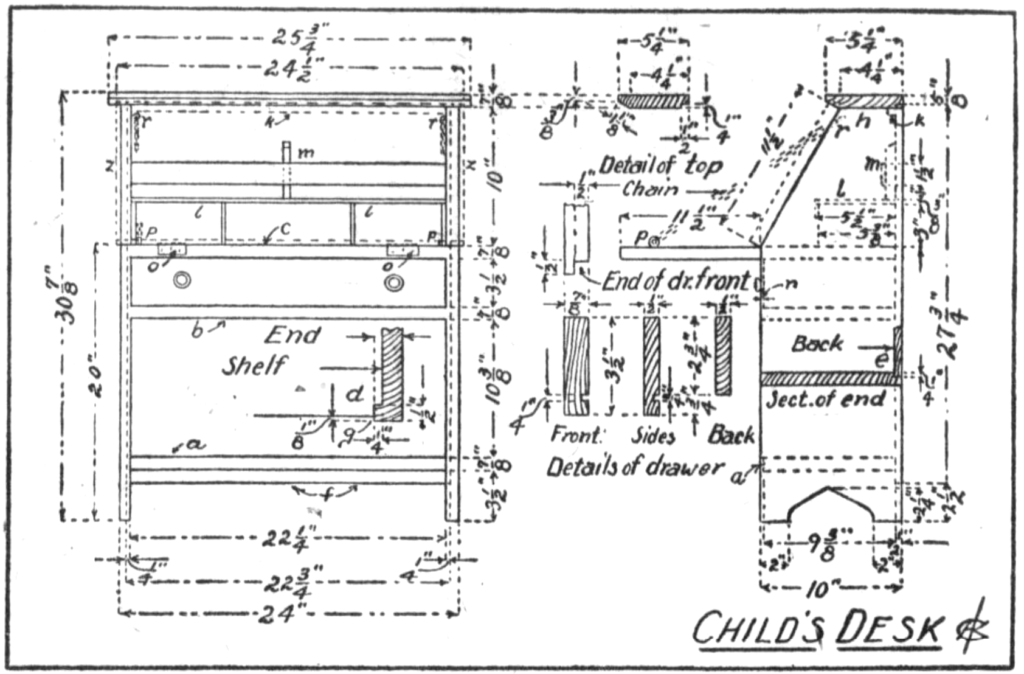
Make the ends, groove them to receive the shelves a, b, c as at d, and rebate the back inside corner as at e to receive the back which should extend below shelf a as at f. Make the shelves and put them in place; shelf a should be set back from the front as at g, and extend to the rebate at e; shelves a, b, and c should be notched at the front as at d and b and c should be set flush with the front and extend to the rebate in the back edge at e.
Fasten the shelves in the ends by nailing through the sides. Make, fit and fasten top of desk at h. Fasten a 1/2” X 3/4” cleat strongly at k to receive the top of the back. Cut the sheathing back and nail it in place. This will hold the desk square while working on it. Cut the 3/8” stock for the pigeon holes at l, and the paper rack at m and fasten them in place.
Make the drawer, setting the front in a little as shown at n; make the drawer bottom of 1/4” material to run lengthways of the drawer. Make the flap of 7/8” X 11-1/2” wide (or make to fit space), and 24-1/2” long; this length will allow it to project by the end, as shown by dotted lines at z. Hang it with stout brass hinged as at o; fit stout brass screw eyes and chain at p and r to support the flap.
Stain, shellac and wax, or if preferred, the desk may be painted and covered with a hard varnish. Use brass or wooden knobs on the drawer.
Source: Perth Amboy evening news. (Perth Amboy, N.J.), 22 Oct. 1923.
