

These instructions and illustration for making your own bevel tool were originally published in 1922.

Make a Bevel Tool
Every “Handy Boy” should find it a matter of satisfaction to make such tools for his own use as can be made with available tools and materials. The bevel described is larger, and will be used more than the smaller ones commonly used, but there will be times when its long tongue will be very useful.
In making this bevel, maple, cherry, beech or other hard, close grained and well seasoned wood should be used, for a high degree of accuracy is essential. First prepare the tongue a, and the two beam pieces b, making them about 1” longer than the required dimensions to allow the bottom to be made safely and finished as one piece. Bore a 1/4” hole through the exact center of the half circle at the upper end of each piece. Use a 1/4” x 1-1/4” carriage bolt; usually the square shank of the bolt will hold it from turning, but the bolt may be made into a screw by filing with a thin file or sawing with a hack saw, a slot in the head as shown at d, to allow the bolt to be tightened as a screw if necessary. Provide a washer for each side at f to receive the pressure of the head and nut.
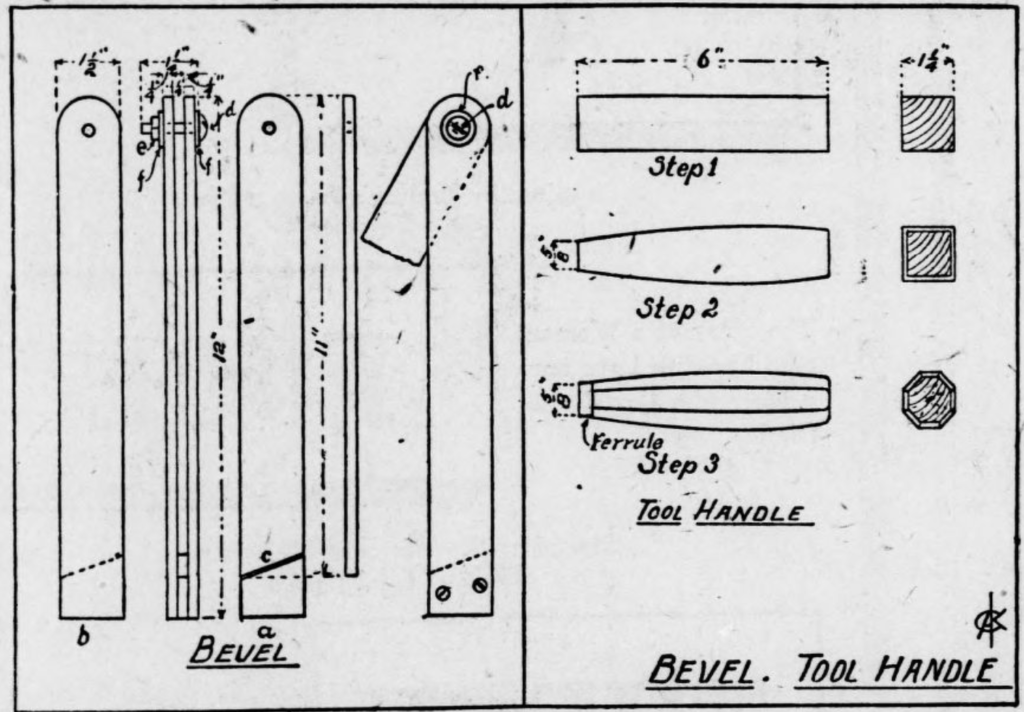
Put the three pieces together with the bolt at the top end, and bore the holes for the 3/4” No. 8 screws which hold the lower end of the beam together. Countersink them and turn the screws in to be sure they turn home properly without splitting the pieces. Remove the screws, make the bevel cut c at the end of the tongue piece, put the beveled end back into its place with glue, hold it rigidly and turn the screws in; in doing this the top ends of the pieces must not be separated. Saw off the ends of the three pieces as one, smooth and sandpaper. If the work has been well done the tongue will slip into its place like the blade of a jack knife into its handle; it may be necessary to plane a little from the sides of the blade to allow it to work easily. The project may be finished by applying boiled oil with a cloth after the glue has thoroughly hardened.
Many professional woodworkers prefer to make certain of the handles for their own tools, for the reason that such a handle as shown can be made of any piece of hardwood. These may be used for handling paring chisels though they are not recommended for mortising or other chisels which are to be subjected to hand hammering.
First the piece is made square, of the desired length and size in section, as in step 1; it is then worked to the shape of the handle, but square in section, as in step 2; after this the handle is made octagon, or eight square as shown in step 3, and the small end worked down to fit a brass ferrule. This is a convenient shape to make and it “feels” better to the hand than a round handle, as it may be grasped more firmly with less strength than if a round handle were used. Sandpaper smoothly, but do not finish with shellac or oil, as the texture of the wood aids in the sureness of the grip, while a finished handle may be more slippery.
Source: The Rock Island Argus and daily union. (Rock Island, Ill.), 07 Oct. 1922.
