

Below are instructions on how to make a window cold box. These were used before everyone had a refrigerator in their kitchens. People would bring in ice to keep their food cold. This box allowed people to store stuff outside their window during the cold months.

Window Cold Box
If the conscience of the thrifty housewife reproaches her for the seeming extravagance of taking ice during the late fall, the winter and the early spring months, the “Handy Boy” may make a window cold box which will answer the main purpose of a refrigerator.
The dimensions of such a box may be varied to suit any window or it may have one or more shelves.
The box should be about 1/8” less in length than the opening of the window between the stop strips as shown at a. The only dimensions given in the sketch indicate the size of the ends of a box which will be high and deep enough to accommodate a 1 quart milk bottle, a fruit jar, and a medium size plate, but it may be as long as the window opening.
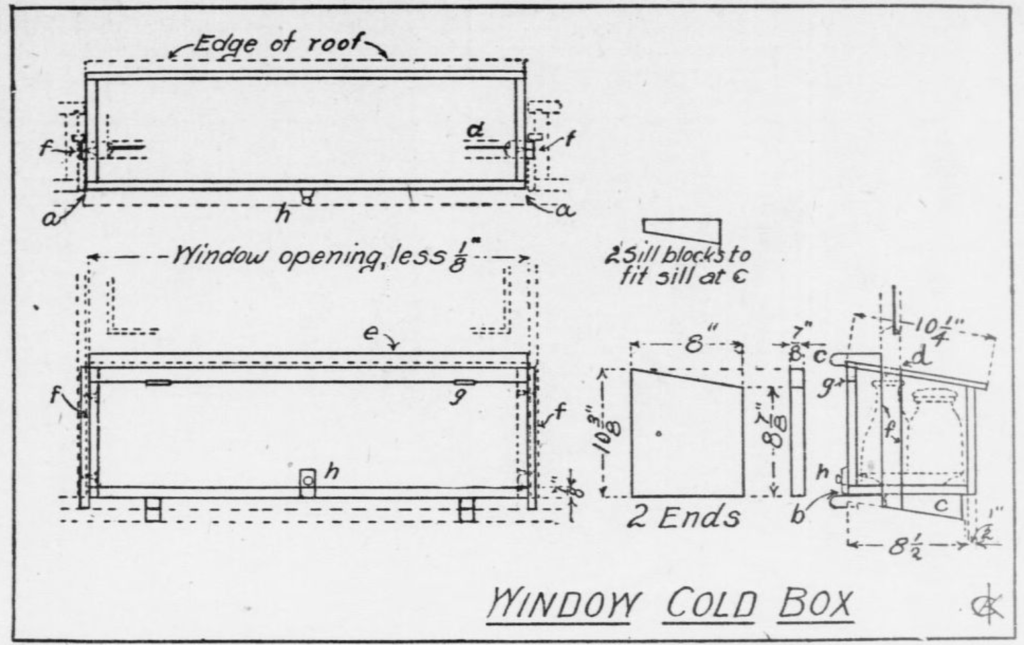
The ends should be made of 7/8” boards to allow for nailing the top, back and bottom strongly. The top and back should be of 1/2” material to allow the temperature of the outside air to do its work; also the door which opens into the room should be of the same thickness, but the bottom should be 7/8” thick. Note that the top extends over the back to allow the water to drop off, that the back is nailed upon the outside of the bottom, and that the bottom projects 1/2” inside of the ends to allow the door to shut over it as at b.
The sill blocks c support the box and insure that its bottom is so nearly level that a dish of liquid may rest upon it. The window sash rests upon the top of the box at d, and the inside may be finished like the window sill by fitting a piece of sill cap upon the top of the box as at e, which allows the window to be nearly as air tight as if it were in its place upon the window stool. The box may be held in place by pieces f, which are 1/2” thick, as wide as the space in which the lower sash runs, and extends from the top of the roof of the box to the window stool, the ends being cut at the same bevel as these.
Raise the window, set the box exactly in the place it is to occupy, drop pieces f into their places from the top and holding the box firmly, put in screws or small nails to hold pieces f. Screws may be easily withdrawn, but if nails are used, their heads may be left out enough to allow them to be drawn with a claw hammer so the box may be removed at any time.
The door may be hung with hinges put on as shown at g, or flat across the face of the door, and the door held closed by means of a cupboard catch as at h.

The box will raise the meeting rail or the top rail of the lower sash above the corresponding rail of the upper sash, and allow a space for the entrance of the air from the outside; this space forms an excellent ventilator, but if it is not desired for that it may be closed by fitting a piece of heavy pasteboard or thin wood against the glass around the frame of the upper sash.
The outside of the box may be painted to match the outside of the house which will make it inconspicuous from the outside, and stained or painted on the inside to match the finish of the room.
A device of this sort must be used to be fully appreciated; especially to those who live in city flats where room is at a premium, and to those who do light housekeeping may this device be of great value.
Source: The Rock Island Argus and daily union. (Rock Island, Ill.), 28 Jan. 1922.
