
Candle shade making was quite a popular craft. While I already made one post on this topic, I wanted to share this 1909 article on making candle shades, with a special focus on the scarab pattern.
This was considered a woman’s craft and most of the articles at that time were focused on the “little ladies” and how they could make their homes nice without spending their husbands’ money.
However, I have become so fascinated with how these candle shades could add a calming or magical feel to a room that I went online and ordered supplies. The order included battery operated candles because I do not want a house fire.
The Arts and Crafts
Candle Shade Making
Pretty shades for candles and small lamps are items of interior decoration that are taken quite seriously into account in the furnishing of the modern artistic home. The “candle” may be a tiny electric bulb shining at the end of a tall candlestick, but this form of illumination has become established by many years of usage and of peculiar fitness for purposes that can be filled in no other way, so that no mater how completely the wax or tallow taper may be superseded as a medium for supplying light, the forms of the candle and its holder do not appear to be threatened any more than the form of the lamp – both give opportunities for grace and beauty in interior furnishing which can not be dispensed with.

There is a fad of the moment, happily not very widespread or showing indications of any permanency, to leave the candlesticks empty, without either candles or shades. This robs them of all reason for existing, and it would be better to remove the candlesticks altogether than to leave them forlornly empty, bereft of purpose as completely as the andirons in front of a gas grate.
After all, many of the modern improvements have not entirely superseded the old things; the furnace and steam pipes or the gas grate have not put the crackling log fire altogether out of commission; there are people who still prefer the soft light of an oil lamp to the white brilliance of electricity of the yellow flare of gas, and candles of an improved make, which burn evenly and will not flow downward in a river of melted wax are still in constant use in many households, not so much as a means of illumination as for esthetic reasons.
Candle Shade Interior Design
Candle shade designing and making has been considered of sufficient importance by some artistically inclined women for them to take it as their exclusive craft. They originate quaint and original shapes and patterns and make use of new materials for the purpose.
One of their specialties is the designing of shades to harmonize with certain schemes of interior furnishing; in these they not only select the most suitable colors and materials, but they make their designs to agree with the style of the room, whether it happens to be Japanese, rococo or Louis XV, Moorish, or the modern mission.
They design shades of one character for the drawing room, of another for the strictly utilitarian library and another for the dainty boudoir. When you come to think about it you will find that in all of these apparently trifling details of interior furnishing there are a good many things to be considered if you want to get the best results and have a really successful interior.
Material
Whatever materials you select for your candle shades, be sure that they will allow the light to shine through; for this reason the opaque shades of copper or brass, sometimes seen of later, are not good; they appear to be directly contrary to the biblical command not to hide your light under a bushel but to place your candle where it will give light.
Where the shades are pierced, of course, the objection does not hold, as this lets the light through; and among the most durable and satisfactory of all candle shades for use upon the dinner tables are those of silver in an open work design of scrolls, which can be lined with silk of any color and so made to cast a light in harmony with the floral decorations.
Be sure that your candle shades are equally as attractive by night as by day, and that when they are illuminated the skeleton of the foundation or other constructive details do not make themselves unpleasantly evident.
Sizing
When you place a shade on a candle select a size and shape that will go well with the proportions of the candlestick, for if it is too large or too small the effect will be ruined.
Dainty Occupation
The making of candle shades at home is a dainty occupation, which most women engage in occasionally. Unless they are too busy or too indifferent to feminine interests to do anything in the way of fancy work they are more likely to make their own candle shades than to buy them.
Attractive shades cost a good deal to purchase, especially if they are designed to order, yet it is not hard to create very pretty ones if one is at all clever with her fingers. The utmost exactness and neatness must be observed in cutting and fitting the parts together in order to obtain a workmanlike result, for a tipping, twisting shade gives a candle a most dissipated and disreputable appearance and removes it from all possible classification as an ornamental object.
Almost any of the candle shades seen in the shops can be made at home, with the exception of the silver shades and a few made of other metals which require special tools and trained craftsmanship.

Cutting the Pattern
To cut the pattern for the circular shades draw two circles having the same center, with a compass (a piece of string, pin, and a pencil will answer), making the distance between the circles equal to the depth that you wish your shade to be. The smaller you make the inner circle, the more flaring will be your candle shade, and the larger this inner circle is made the closer in toward the candle will come the bottom of the shade.
A good average size is an inch and a half diameter for the inner circle, and five and a half inches for the outer one; this will require a lap of about two and a quarter inches at the top.
Cut along one radius of the circles to the center, then cut out the two circular edges; lap the shade, drawing it up until it is the desired size at the top and then cut away the superfluous lapping, leaving just enough to glue (about half an inch).
In making paneled shades, or, in fact, shades of any kind, cut them all in one piece whenever possible; this can always be done when the joining sides are straight.
Popular Shades
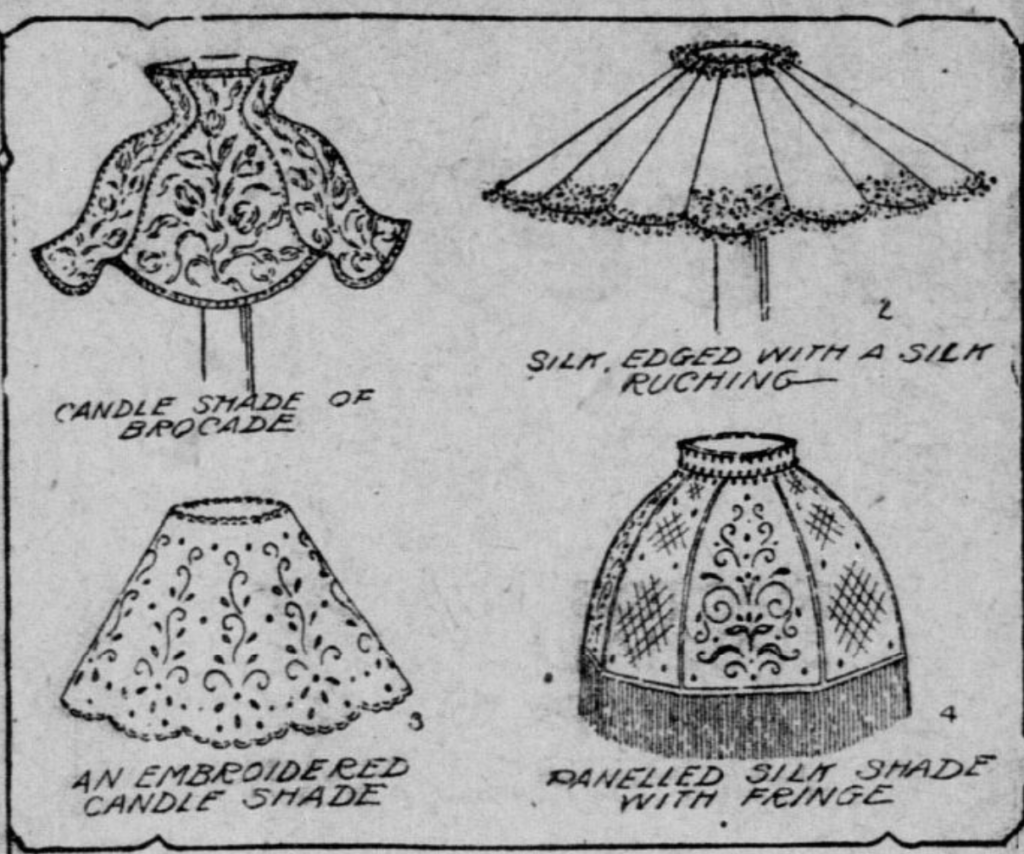
Many of the shades now popular are made of silk and have either a silk or a beaded fringe at the bottom which gives a pretty color effect when the light shines through them; often the shades are edged with a tiny ruching of the material, or sometimes with a narrow fancy silk braid.
Embroidered candle shades of linen appeal to the woman who likes to have all of her small belongings pay occasional visits to the wash tub. They are made with buttonholed edges and very open designs in eyelet or Venetian ladder work which permit the colored silk linings to show through.
Hand painted shades are generally made of heavy paper or light Bristol board, or of silk, and are decorated with water colors in floral designs or conventional garlands and bowknots, sometimes touched up with gilt.
Wire Frames
The wire frames for the shades can either be purchased ready made or may be constructed at home with the aid of a pair of pliers; the latter method is the only way to get odd and unusual shapes, for those which you buy are generally just the simple round form.
In making the frames use rather stiff steel wire and form them very carefully, so that they will be true and exact in every part.
Besides this wire frame on which the candle shade is built, there is a little holder which fits on the candle and on which the shade rests. The kinds of holder that slips over the candle with two little metal bars across its upper end is the best, as this lowers the shade automatically as the candle burns and you do not have to keep watching and readjusting it.
Pierced Metal Shades
The pierced brass and copper shades are popular just now, but unless they are very well executed they have a most unattractive appearance, and unless the holes are close together and fairly large they are too opaque to be very successful.
Stencil Shades
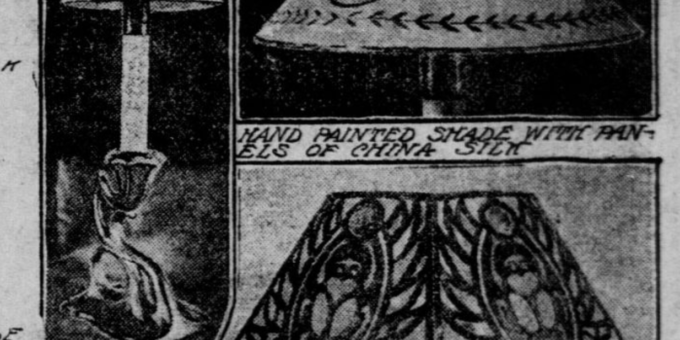
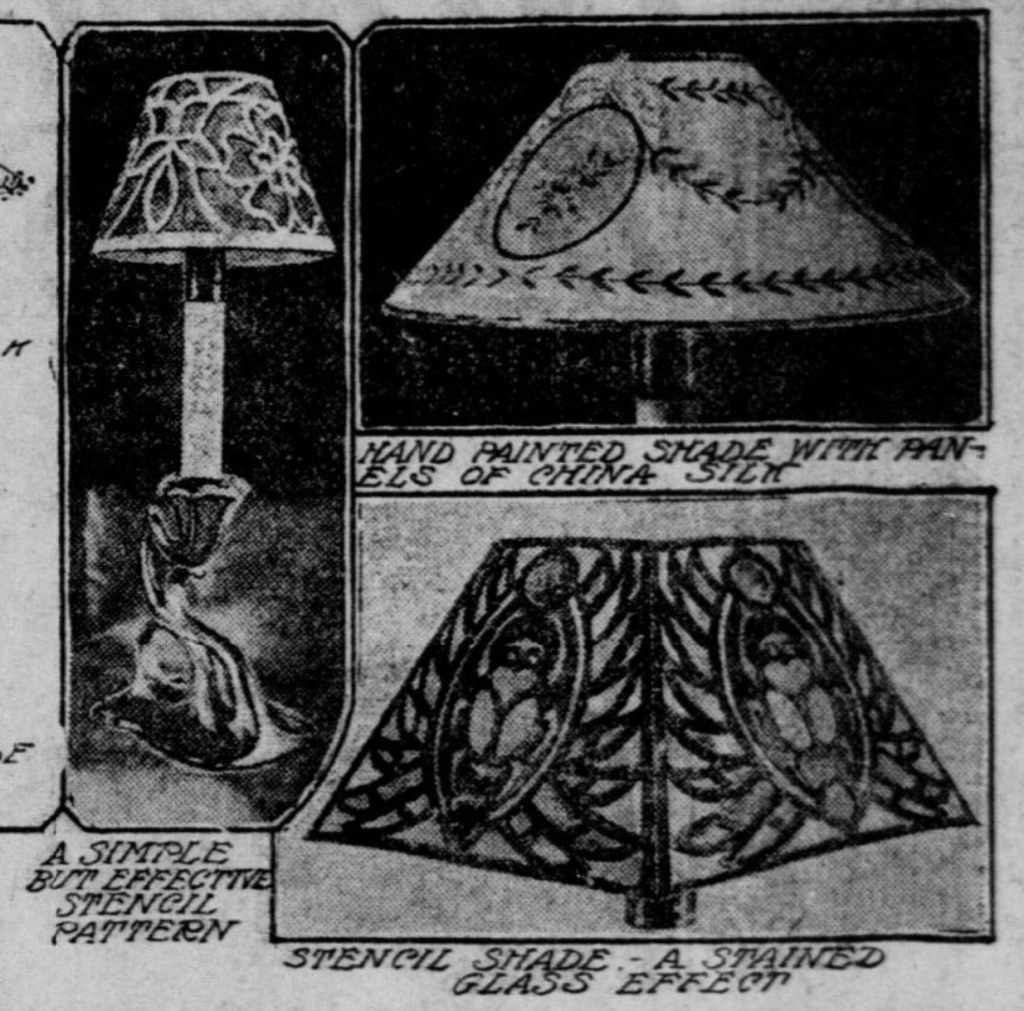
A form of candle shade which goes exceedingly well with the mission and craftsman furniture is the cut stencil shade lined with colored tissue or silk, and many of these are to be seen now in shops which have a reputation for artistic merchandise.
One of these is shown in the illustration; it has an Egyptian scarab or sacred beetle on each of the five panels, and the same design would answer equally well for a six or a four panel shade, simply making a slightly wider margin at each side for the one with four panels.
A line drawing of one of the panels in the exact size for making it given, and this can be traced off or transferred with carbon paper. Use rather heavy pasteboard that is not too tough, for the stencil, and after transferring one panel place another alongside so that the edges meet, and transfer this; do the same with all of the panels and then cut out the entire shade in one piece, bending the dotted side lines between the panels over the edge of a ruler; then cut out the stencil with a sharp penknife and when it is completed give it a coat of black water color or ink on the right side.
When it is dry, place it face downward and coat it thinly with glue on the wrong side, then lay a sheet of white tissue paper or thin China silk over this, making it adhere in every part.
The black and white coloring can be left, if preferred, or a stand glass effect can be given by painting the tissue or silk in the openings of the stencil with different colors. When the light shines through these colored openings the effect is very pretty and quite like stained glass.
Another shade, also made in stencil fashion, has curved sides and a boxlike lower part. This is cut all in one piece, the angles at the bottom being bent, and the curved upper portion of the panels being joined together with glue. Either of these shades may be made of thin sheet metal, copper, brass or iron, and then lined with silk, if one has the proper tools and is used to amateur metal work.
Circular Shade
A circular shade which is very effective and easy to make has a simple stencil pattern of wild roses and leaves. When this is cut out the pasteboard can be gilded or silvered, painted black, or given a coat of white enamel paint, and can then be lined with silk of any color; the shade in the illustration has been enameled white and lined with Dresden blue silk.
Another shade illustrated is made of heavy paper on which are painted pink bowknots and garlands of green leaves; oval openings are cut at intervals and little panels of China silk with tiny pink flowers set in; the top and bottom of the shade and the oval openings are edged with a gold band. Tissue paper can be used instead of silk for the panels; it must be cut and set in very evenly, for its outlines will show when the candle is lighted.
Sometimes, for rooms which have matting on the floor and are furnished with wicker furniture, shades are made of sweet grass or raffia plaited and woven together into simple forms.
Plan Ahead
It is a good plan when trying new effects to light a match and hold it under the work, as often what appears very attractive by daylight loses all of its charm when the rays of light shine through it.
Source: The San Francisco Call. (San Francisco [Calif.]), 07 Nov. 1909.
