
American newspapers were filled with projects meant to keep boys busy outdoors, and many of them involved homemade weapons.
Long before video games and television, children were expected to invent their own entertainment. Vacant lots became battlefields. Tree branches became swords. Scrap wood, rubber bands, and barrel hoops became surprisingly sophisticated projectile weapons.
Newspapers eagerly encouraged this creativity, publishing detailed instructions for homemade bows, slings, catapults, and mechanical gadgets that today would probably alarm most parents.
One such article, published in 1913, introduced readers to two “harmless” backyard weapons: an improved whip bow capable of launching arrows hundreds of feet, and a homemade crossbow constructed from lath, rubber bands, and a steel barrel hoop.
To modern readers, the article feels like a strange mixture of frontier ingenuity, childhood adventure, and casual danger. It’s a glimpse into a time when boys were expected to learn by building things with their own hands.
Below is the original article as published in the Turner County Herald on July 24, 1913.
A New Whip Bow and a New Crossbow

Homemade fireless firearms can be productive of much fun in the back yard or vacant lot, and with homemade targets to shoot at, a boy needs but practice to attain an accuracy of aim that will make him an expert in the handling of them.
The whip bow and the cross bow are two harmless weapons that are popular among boys and in the illustrations you will find a new form of each which I have devised for you.
Whip Bow
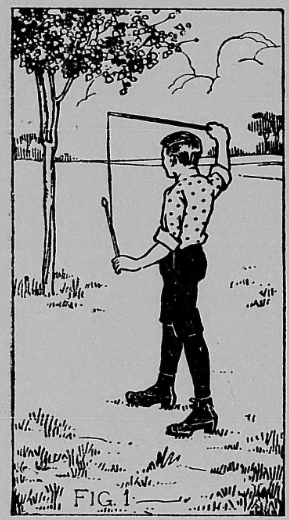
The whip bow which the boy is using in Fig. 1 differs from the ordinary kind in the whiplash. This is made elastic by inserting several rubber bands as shown in Fig. 2, which makes it possible to sling the arrow at a greater distance than can be done with the cord lash, as it gives to it the qualities of an elastic “sling shot.”
For the whip handle, take any springy stick about 2 feet long — a small tree branch will do, and notch it near one end as shown in Fig. 2. To receive the whip lash. Any stout cord will do for the lash.
Fasten two or three rubber bands together by looping them end to end, and tie about two-thirds of the length of the cord to one end and the other third to the other end.
After tying the cord to the whip handle, tie a hard knot at the free end.
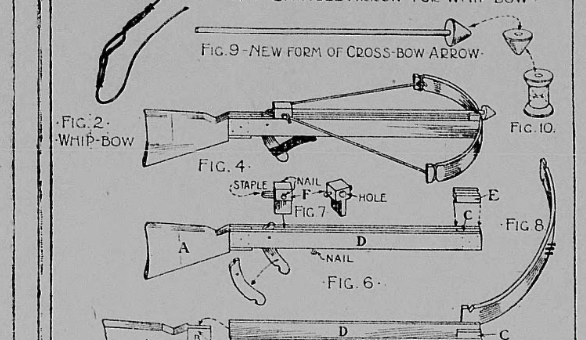
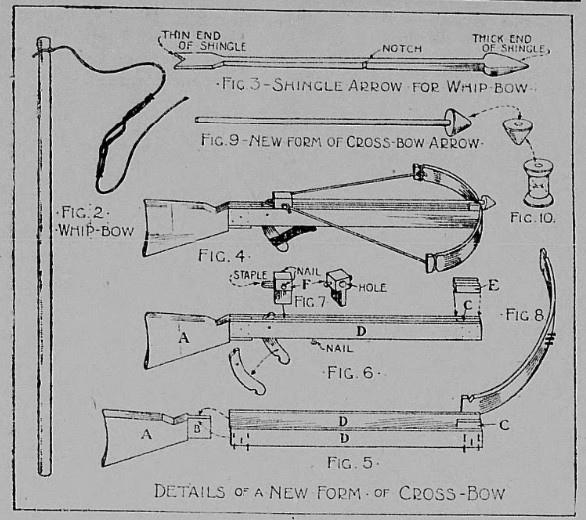
Arrows can be cut of any straight-grained wood. Fig. 3 shows a good form of arrow cut from a shingle. If you can find a shingle you can make several arrows out of the one piece.
The head of the arrow is cut on the thick end of the shingle, and the tail on the thin end. The shaft of the arrow must be notched to receive the whiplash, and this must be at the “center of the balance,” which may be determined by holding the arrow across the edge of your knife blade and sliding it one way or the other until it balances.
The notch should slant in the direction of the arrowhead.
To sling the arrow, slip the end of the whiplash into the notch and draw it through as far as the knot. Then holding the tail of the arrow in the left hand and the whip bow in the right hand, as shown in Fig. 1, fling out your right arm full length and at the same time release the hold on the arrow.
The arrow can be shot high into the air, or straight at a target. The record throw with a whip bow is 372 feet. Probably you will not make a new record, but with practice you should be able to sling your arrows a considerable distance.
Cross Bow
The new form of cross bow shown in Fig. 4 requires two pieces of lath for the barrel, a barrel hoop for the bow, a piece of a 7/8-inch board out of which to cut the stock, trigger, etc., and two heavy rubber bands.
Cut the stock (A) about 8 inches long, and of the shape shown in Fig. 5, and remove a piece 3/8-inch in thickness from each side of the small end B, as shown, to receive the ends of the barrel pieces D.
Block C should be cut to the same thickness as end B, to fit between the opposite ends of strip D. Cut strips D 20 inches long.
Block E should be fastened to the end of the barrel. The top should be grooved as shown. If you can find a tongue-and-grooved board, cut this block out of the grooved edge.
The bow-string block F slides along the top of the barrel with the lower thin potion sticking down between pieces D. Drive a staple into the back of the block, drive a small nail into the two side faces, and bore a half-inch hole in the front face in a position that will correspond to that of the grooves in block E (Fig. 7).
The trigger (Fig. 6) is notched on top so the staple in block F will catch on it, and the lower end has a notch in one edge to receive rubber bands.
Pivot the trigger between the barrel pieces D with a small nail or brad, adjusting the top end so the staple will catch lightly when the trigger is cocked, and slip off easily when the trigger is pulled.
The rubber bands extending from the lower notch in the trigger to a small nail driven into the under side of the barrel, must be strong enough to hold the trigger against the pull of the bow string.
A barrel hoop forms the bow of the gun. Notch each end of the bow (Fig. 8), and nail it at its center to the end of the barrel. Tie the bowstring to the nails in block F and the ends of the bow.
The arrows for this form of cross bow must be of the right length to extend from block F to a trifle beyond block E, for the forward end rests in the groove in E, and the rear end sticks into the hole in block F.
The shaft of your arrows can be cut out of laths, and excellent arrowheads can be made out of thread spools by first sawing spools into halves and then tapering them to blunt points (Fig. 10). The ends of the shafts stick into the holes of the spools, as shown in Fig. 9.
Source: Turner County Herald. Hurley, Dakota, S.D. July 24, 1913.
You can find Neely Hall’s book, Handicrafts for Handy Boys, on Amazon. (Linked)
