
Who doesn’t love to sit on the swing on a sunny afternoon and swish-swoosh in the warm summer air? the following article shows how swings were built in the backyard for children in the early 20th century.
Swings and Swing Supports
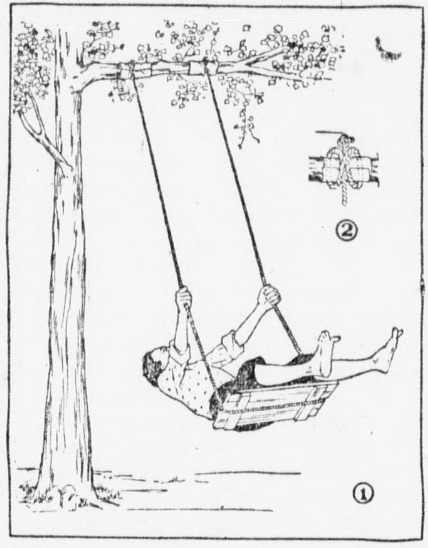
If a large tree with a spreading limb 20 feet or so above the ground is at hand, nothing better could be wished for as a support for a swing. If you are going to make a tree swing, Figs. 1 and 2 show how the supporting limb must be wrapped with cloth before the rope is attached, for protection to the bark; they also show how the rope ends should be knotted, then tied with a clove-hitch.
Cut notches in the center of the ends of the swing seat, for the swing rope to fit in, and nail a pair of cleats across the under side of the board to prevent its warping (Fig. 3).
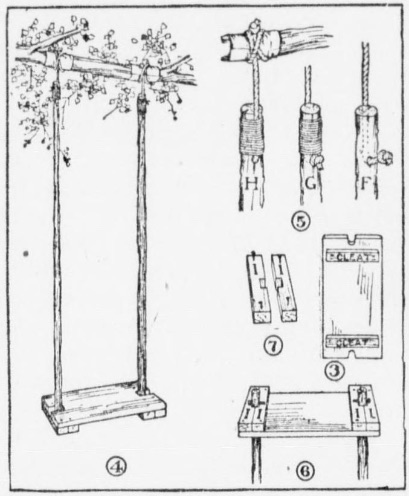
Long, straight poles may be substituted for ropes (Fig. 4). If you live near woods, you can easily find a pair of poles of the right size; if you do not, perhaps you can obtain a pair of rug poles, which will do equally as well. Bore a 1-inch hole through each pole about 8 inches from one end, slip the end of a piece of rope through the hole, knot the end (F, Fig. 5), and pull the knot close up to the hole. Then bind the rope to the pole by wrapping with heavy cord (G, Fig. 5), and fasten the free end to the tree branch in the manner previously described (H, Fig. 5).
The ends of the seat board must be notched to receive the pole ends. Cleats I (Fig. 6) fastened across the underside of the seat, are notched to fit around the poles, and are nailed or screwed in place. To support the seat, bore a hole through each pole several inches above the lower end, and drive a bolt, large screw, or spike through the hole for cleats I to rest upon.
If you build a framework for a swing, fasten one side to a fence, as shown in Fig. 8. Then it will require less bracing. A detail of the end struts of the framework is shown in Fig. 9. For these you will need 2x4s 16 feet long for the uprights A, pieces of 2×4 for cross pieces B and C, and top beam E, and boards 4 inches wide for braces D. Trim off the upper end of uprights A, so when placed in the positions shown in Fig. 9 they will fit squarely against top beam E. Spread the lower ends of uprights A about 8 feet apart. The frame fastened against the fence will not require braces D if it is fastened securely to the fence.
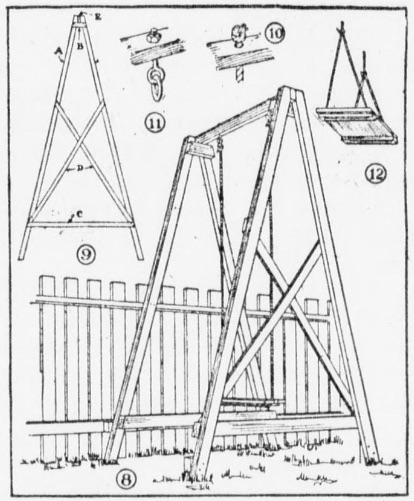
The swing rope may be passed around the top beam and tied, or run through holes bored through the beam and knotted (Fig. 10), or fastened to a ring bolt run through the beam (Fig. 11).
Fig. 12 shows a good plan for supporting a wide swing seat, so as to prevent its tilting. In the first place, fasten cleats across the underside of the board, near the ends, then bore a pair of holes through the seat board and the clients. Instead of looping the swing rope at the swing seat, cut it in two. then run each rope end down through a corner hole in the seat, along the cleat to the hole near the other end, up through the hole, and tie to the standing part of the rope several feet above the swing seat (Fig. 12).
Source: Essex County herald. (Guildhall, Vt.), 02 Dec. 1920.
