
While the push coaster looks rather dangerous, the box sled appears to be more than handy when moving items through the snow. Both of these wood projects were originally published in 1920.

Push Coaster and Box Sled
For pushing over the ice the same way that you operate your homemade scooter with roller skate wheels, the push coaster in Fig. 1 is an excellent type of sled to build. The handle bar and supports can be released and dropped forward as shown in Fig. 2.
Figure 3 shows longitudinal section through the sled, and Fig. 4 shows a front view. On these two drawings, corresponding parts have been marked with similar letters, and you will find the same letters upon the details shown in Figs. 5 to 8.
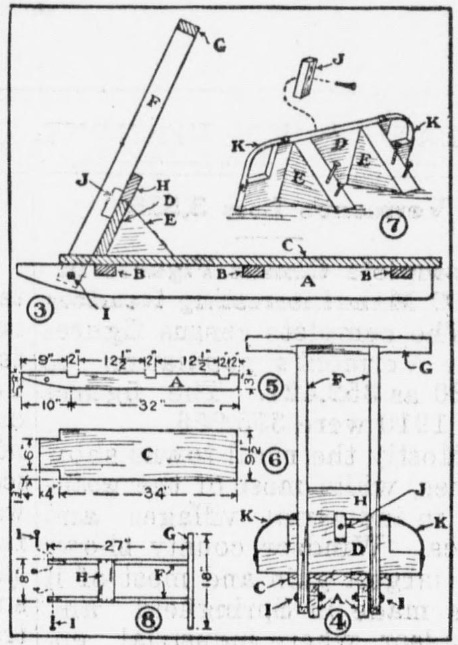
Runners A can be cut out of a board 7/8 inch thick. The notches shown along the upper edge, in the pattern of Fig. 5, are provided for the connecting cross pieces B (Fig. 3). Cut cross pieces B 6 inches long and nail their ends to the runners. Cut the seat C by the pattern in Fig. 6. The forward end is notched to fit between the handle bar uprights. Nail the seat to the runners and to cross pieces B.
Figure 7 shows the base support for the handle bar uprights. board D, braced by blocks E, is set at an angle so the handle bar uprights F will tilt back as shown. Notch the corners of board D, and fasten the straps K in the positions shown (Fig. 7), to provide pockets to slip the toes through when coasting while seated.
Prepare the handle bar G and uprights F as shown in Fig. 8. Bore holes through uprights F near the lower ends, also through the bow ends of the sled runners, to receive carriage bolts (I) for bolting the uprights to the runners. Nail the cross pieces H to uprights F in the proper position, so when the handle bar is raised it will just clear the top of board D (Fig. 4). Prepare a wooden button (J), and screw it to board D as shown so when turned up and down it will lock the handle bar framework in its inclined position. Shape the ends of handle bar G round. Nail the bar securely to the tops of uprights F.
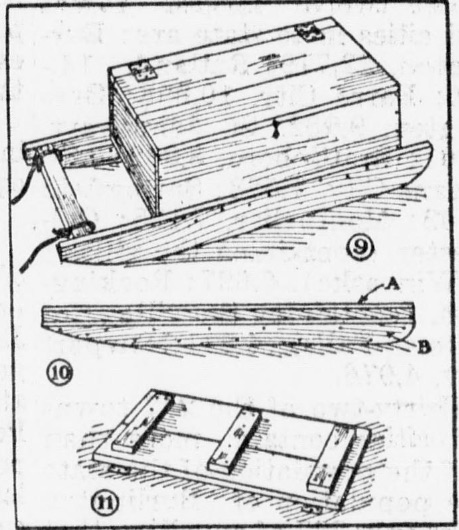
The box sled shown in Fig. 9 has a locker in which to carry packages.
A good scheme for a runner is shown in Fig. 10. By doubling two pieces of 7/8 inch material in this way, you have a broader surface on the bottom of the runners, and the top edge of the narrow piece (B) forms a support for the box. Nail the box used for the seat to the top of runner strips B, and nail through strips A into the sides of the box. Nail a cross piece to the bow as shown, for a football.
Nail a narrow strip to the box to, along one edge, then batten together enough boards to cover the remainder of the top (Fig. 11), and hinge to the strip. Provide a hook-and-eye for holding the cover down.
Source: Essex County herald. (Guildhall, Vt.), 30 Dec. 1920.
