
The following plans are for making a magazine rack, a blacking case (for show polishing), and a small table. The article below was originally published in 1913.
For a Boy’s Room
The boy who takes pride in fixing up his room is usually one who is interested in making things, and his room is almost certain to contain a number of pieces of homemade furniture and conveniences. No matter how poor his working material may be, he usually manages to transform it into things that are useful, and for the very reason that they bear a rough appearance, compared with what might be constructed out of new material, the room containing such furniture will approach nearer to the “ideal” than one fitted up entirely with store furnishings.
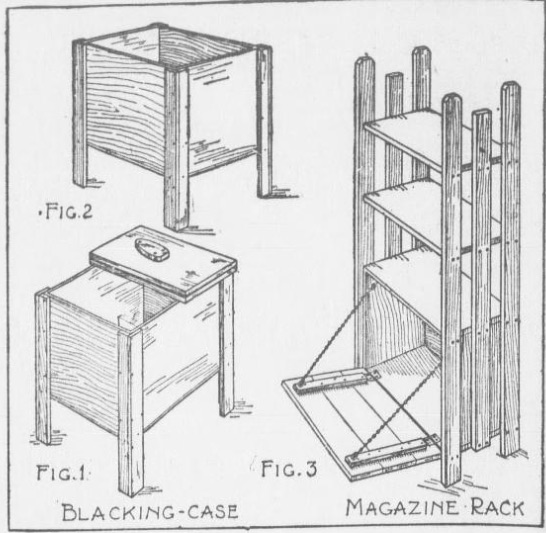
The blacking case, magazine rack, and tabouret illustrated below are useful pieces of furniture that every boy should have in his room, and all three may be made out of boxes and odd pieces of boards.
A soap box is of just the right size for the blacking case (fig. 1). Cut two strips for each leg, making one 3 inches wide and the other as much narrower as the thickness of the wood. Nail the face of the wide strip to the edge of the narrow strip, and then fasten to the corner of the box )fig. 2). The top should be made of two pieces, of the proper size to form a projection of about 1 inch over the sides of the box all around. One of these pieces should be nailed in place, and the other piece should be hinged to it. To the inside face of the hinged board fasten a block of wood for a foot rest. Use the sole of your shoe for a pattern for this. Divide off the inside of the box with a center partition (fig. 1), so as to provide one-half of the box for cans of shoe polish and bottles of dressing, and the other half for rags and brushes.
The top shelf of the magazine rack shown in Fig. 3 may be used for books, and the bottom cupboard to hold your large supply catalogues, and odds and ends for which you have no room in your writing desk.
Procure a grocery box for the lower portion of the rack, and after cutting the six side uprights screw or nail them to the ends of the box. Project the four corner pieces 3 or 4 inches below the bottom of the box for legs, and set the bottom of the middle pieces flush with the bottom of the box. Trim the tops of the uprights as shown. If you cannot get boards that are wide enough for shelves, you can use two or more boards, fastening cleats to the inside faces of the uprights to nail them to. Batten together the cover boards of the box used for the lower compartment, for a drop leaf, hinge it to the lower edge of the box, and suspend it by means of two chains to keep it from prying off its hinges.
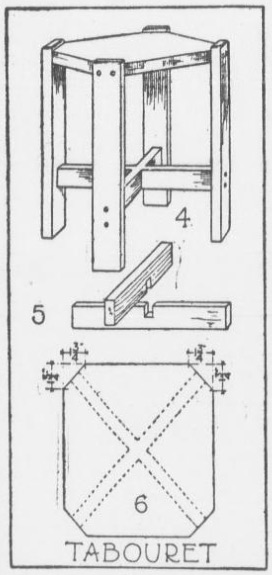
You will need a board 10 or 12 inches square for the top of the tabouret shown in Fig. 4. Mark off points 1-3/4 inches each side of each corner of the board, and connect them with diagonal lines (Fig. 6); then cut off the corners on these lines. Make the legs 16 inches long and 2 inches wide, and bevel the top edges as shown. The leg braces are “halved’ together; that is, a piece the thickness of and one-half the depth of the braces is cut out of the center of one edge of each piece (Fig. 5), so when the pieces are crossed at right angles one will lock in the other. The cutting must be done carefully in order to have the pieces fit exactly. By placing the braces upon the top piece, in the position indicated by dotted lines in FIg. 6, you can check your work; of course the ends of the braces must reach to the center of each corner. Fasten the legs to the braces and top piece with round-head screws.
Sandpaper your work carefully, putty up nail holes and cracks, and finish either with a prepared wood stain or oil paint.
Source: The Southern herald. (Liberty, Miss.), 11 April 1913.
