
The following illustrations and instructions for making your own flower boxes were originally published in 1912.
Home Made Flower Boxes
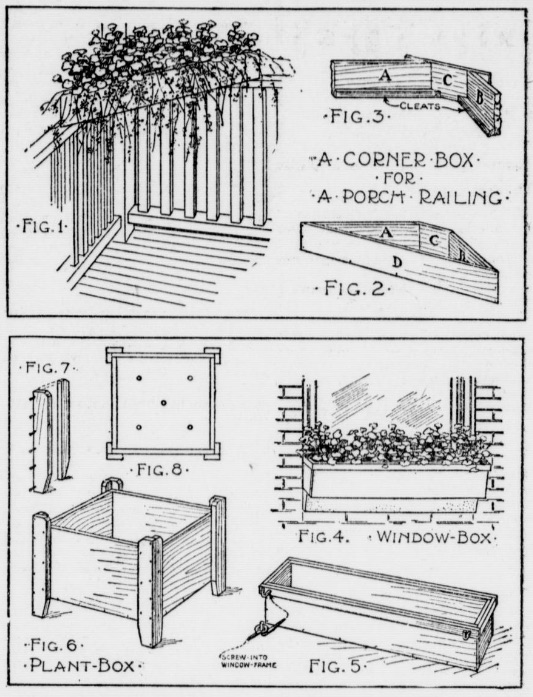
Here are the designs for three forms of flower boxes that are simple to make – a corner box for the porch railing, a box for the window sill, and a box to stand upon the porch floor or upon the lawn. From the three you can select the one you like best.
For a porch railing, a corner box such as shown in Fig. 1 will hold enough flowers to make of it a veritable flower bed, and with vines planted along the front and allowed to hang down over the box the effect will be very pretty. Fig. 2 shows the completed box. The idea of cutting off the rear corner of the box and attaching the short piece C is so that the sides of the box will extend over on to the tops of the railings for support. Of course this will not be necessary in case the corner post does not extend higher than the railing. The ends of the side pieces A and B must be trimmed off to the right angle to fit against the front and back boards C and D, but the ends of B and C may be left square until after they have been nailed to A and B (See C, Fig. 3), when it will be an easy matter to saw them off flush with the sides of A and B. Nail a narrow strip to A and B, at the lower edge, for cleats to support the bottom boards (Fig. 3); then cut and fit the bottom boards in place. Bore a number of half-inch holes through the bottom for drains.
The only difference between the construction of the window box in Fig. 4 and that of an ordinary grocery box is that the bottom of the flower box is fitted between the sides and ends, instead of nailed to the bottom edges (Fig. 5), and a narrow strip is nailed on around the top edges. It is this narrow top band that gives the box its style. Eight inches is a good width, six inches is plenty deep, and the length should be such that the box will extend along the entire length of the window sill. A simple method of anchoring the box in position is shown in Fig. 5. Screw the screw-eye into the window frame and the screw hook into the box. Care of course must be taken to set the box far enough out so it will not interfere with the raising of the window screen. Bore the drain holes through the bottom board about six inches apart.
A soap box will do for the plant box illustrated in Fig. 6, but you will have a neater appearing job if you build it up yourself, fitting the bottom boards between the sides. Fig. 7 shows how the corner strips should be prepared and fastened together. Make them long enough so the tops will project one inch above the top of the box, and the lower ends about two inches below the bottom. The upper corners can be cut off by means of a chisel. In fastening the corner strips in place, be careful to make the lower projection equal. Fig. 8 shows a good way of spacing the drain holes.
A dark shade of green always looks well upon flower boxes, although it is sometimes thought best to paint them the same color as the house trimmings. You can use your own judgement about this. Drive all nail heads below the surface of the wood, and putty the holes before applying the paint.
If you make your flower boxes neatly, probably you can get orders from neighbors for similar boxes and earn some money for your bank account.
Source: The Yale expositor. (Yale, St. Clair County, Mich.), 19 Dec. 1912.
