
The following article was originally published in 1913 and gives instructions on how to make a simple wooden tool chest and tool rack.
A Tool Chest and a Tool Rack
If you received an outfit of tools for Christmas, or a few as the start of an outfit, one of the first things you should do is provide a receptacle for them – unless they came in a chest or cabinet.
A chest is very simple to make. A grocery box or small packing case about 28 inches long, 14 inches wide and 10 inches deep may be used, and one may be procured at the grocery or a dry goods store for 10 or 15 cents. Select a box that is in good condition, and go over it and re-nail all boards that show signs of loosening; also drive in a few extra nails as additional re-enforcement.
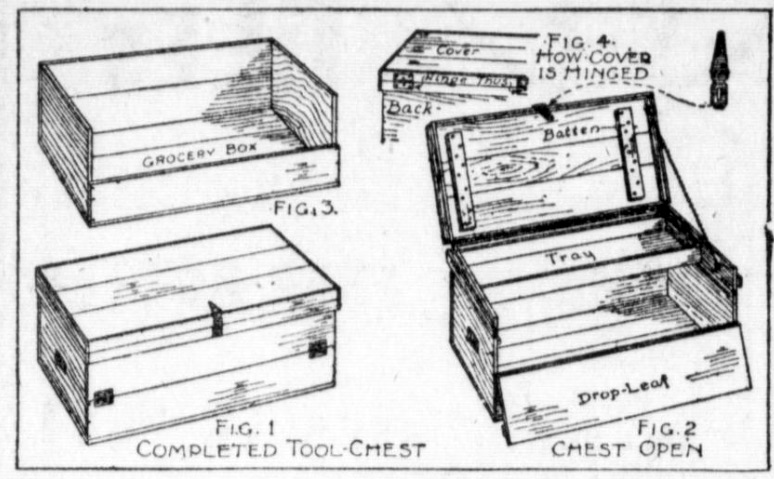
The chest shown in figs. 1 and 2 has a drop leaf in front, which makes it a big improvement over the common form of solid front, because you can reach down under the tray and get a tool in the bottom of the chest without having to remove the tray. One of the side boards of the box should be removed for the drop-leaf, and it should be hinged to the remaining portion of the side, as shown.
Batten the cover boards together upon the under face with two battens, as shown in fig. 2. Then cut a number of strips two inches wide and three-eighths-inch thick and make a rim for the cover, nailing the strips to the edges as shown in the drawings. Set the cover upon the top of the box, locate where the lower edges of the rim come, and at this point nail a band of the two-inch strips around the box. This will form a ledge for the cover to set upon. Hinge the cover in place as shown in fig. 4. fasten a hinge-hasp to the cover and a staple to the narrow band strip nailed to the drop-leaf; then, by throwing the hasp over the staple and slipping a padlock through the staple, not only the cover will be locked, but the drop-leaf will be also. Procure a pair of trunk handles, window sash lifts or drawer pulls for handles, and screw one to each end of the box.
The tray should be made a trifle shorter than the inside length of the box, about one-half of the width of the box, and three or four inches deep, and a small strip should be tacked to each end of the box, for a cleat to support the tray. Hooks and pockets may be fastened to the inside of the cover, to hold tools, and the bottom of the chest may be partitioned off with strips for the planes, saws, etc.
Stain the chest any color you wish to have it, making a stain of oil paint thinned with turpentine, and when this has been allowed to soak in give the wood a coat or two of shellac.
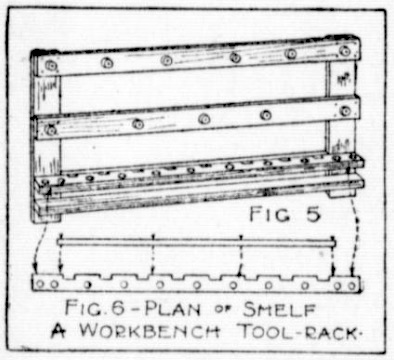
It is very handy to have a tool rack back of the workbench, or on the wall within easy reach of the bench, to hold tools between operations, and a simple form for such a rack is shown in fig. 5. The lower shelf is intended to rest upon the bench top, if you fasten the rack to the bench, and it supports the ends of bits and other small tools dropped into the holes in the shelf directly above it. Cut the two shelves of equal proportions. Bore holes through the upper one, spacing them about as shown in fig. 6, and then with a saw and chisel cut slots in the back edge of the piece and nail a narrow strip such as is shown in fig. 6 to the shelf to form a back to the slots (fig. 5). Spools of various sizes should be screwed or nailed to the upper horizontal piece of the rack, to hang tools upon.
If you fasten the rack to your bench, screw the lower shelf to the bench top and the lower ends of the uprights to the back of the bench.
Do not leave your tools in the rack when you are through working. It will be too great a temptation for somebody to borrow a tool now and then, which they may forget to return to its place. Put everything away in your chest, and you will always know where to find it.
Source: The Yale expositor. (Yale, St. Clair County, Mich.), 08 May 1913.
