

The following instructions for making a push mobile were originally published in 1920.
A Push Mobile
The push mobile in Fig. 1 is one of the simplest.
If you don’t own any wheels, perhaps you can buy some cheaply at a second hand store, or find a boy with whom you can make a trade for exactly what you want. Get the iron axles, rods, and nuts and washers that belong to the wheels, if possible. In case an axle is missing, or is too short, go to a blacksmith or machinist and get him to thread a piece of rod of the right length.
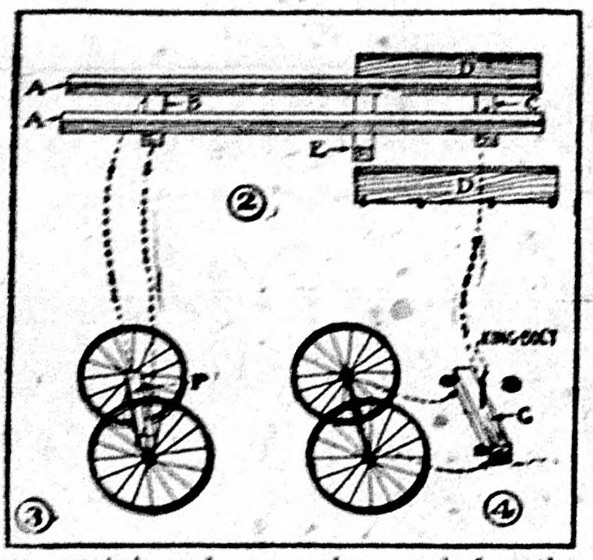
Figure 5 shows the completed chassis, and Figs. 2, 3 and 4 show details of its construction. Rails A and connecting cross pieces B and C (Fig. 2) are pieces of 2×4. The length of rails A will be determined by whatever length you wish to have the car, while that of the cross pieces will be fixed by the length of the wheel axles. Boards D, nailed to the side of rails A, support the hood framework, and cross piece E is a footrest.
If the front and rear wheels are of equal diameter, wooden axles F and G (Figs. 3 and 4) can be of equal thickness; use pieces of 2×4. Fasten the iron axles to the wooden axles either with staples or bent over nails. Buy a carriage bolt long enough to extend through wooden axle G and through cross piece C (Figs. 2 and 4), for a king bolt, and with this pivot the front wheels to the front of the chassis.
The hood framework is made of barrel hoops (fig. 5); nail the ends of the hoops to side boards D, as shown.
A sewing machine wheel or wagon wheel may be used for the steering wheel, and a piece of a broom handle or curtain pole may be used for the shaft (figs. 5 and 6). Bore a hole in the inner edge of cross piece C (fig. 6) for a pocket for the end of the shaft to fit in; fasten a board in the inner end of the hood framework (H, fig. 5), and notch its upper edge to support the upper end of the shaft.
Figure 6 shows the method for connecting the steering wheel shaft with the wheels. Cut cross piece I a trifle shorter than the distance between rails A, and bore a hole through its center for the end of the shaft to fit in; then bore a hole of equal size through a block (J), and nail this block to strip I so the two holes are over one another (fig. 6). By driving a screw through an edge of strip I, and another through an edge of block J strip I will be fastened securely to the shaft. Screw a screw eye into one end of strip I, and another into the under side of each of the two rails A (fig. 6), then attach a rope or chain at the center of its length, to the screw eye in I, pass the ends through the screw eyes in rails A, and tie to screw eyes screwed into axle G near the ends (fig. 4). The lengths of the rope or chain ends must be such that when cross piece I is turned to the position shown in Fig. 6, the left fore wheel will turn in, and when turned halfway around the other way, the right fore wheel will turn in.

The hood may be covered with tin, stovepipe, canvas or cardboard. Cover the radiator front with screen wire, and tack narrow strips of tin around the edge of the wire for a binding.
Good headlights are made from lard pails (fig. 8). Nail a pair of brackets like K to the hood and nail the pails to them.
When you have completed your push mobile give it a couple of coats of paint; putty nail holes, cracks, and joints before you apply the second coat of paint.
Source: The bystander. (Des Moines, Iowa), 09 Dec. 1920.
