
Our recent ancestors were able to make the niftiest items from almost anything, including this box desk from a wooden packing case.
The directions below were originally published in 1917.
A Homemade Desk With A Picture Scroll
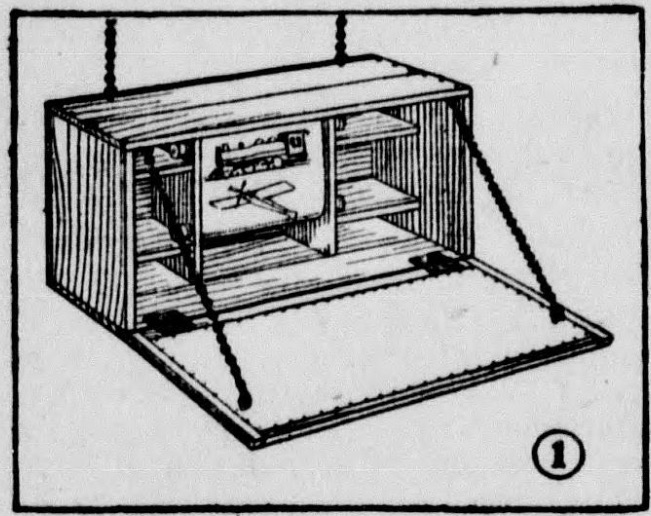
Every boy can own a desk, because it is one of the simplest pieces of furniture to build. I have designed a great many desks for boys to make, but I believe that the one shown in Fig. 1 will be the most popular yet.
This desk is made out of a small packing case, or a grocery box. Select the best looking box you can find. Get the cover boards, too, because you will need them for the hinged drop leaf.

The first thing to do is to reinforce the nailing of any boards which show signs of coming loose. then prepare the pigeonhole partitions. Fig. 2 shows the inside of the desk. Partitions A should be fastened seven inches each side of the center of the length of the box, or 14 inches apart, and shelves B should be so spaced that there will be a small top and bottom pigeonhole and a larger one between. Holes C in partitions A (Fig. 3) are provided for the rollers of the scroll to turn in. Bore the upper one about three inches below the upper end of A, and place the lower one ten inches or so below it. Nail partitions A to the end of shelves B; then stand these assembled pieces in the box, set a temporary brace between partitions A to hold them in the right position, and drive nails through the ends of the box into shelves B and through the top and bottom of the box into the ends of partitions A.
Cut the scroll rollers D (Figs. 5 and 6) from pieces of broom handle, a trifle shorter than the distance between the partitions A, and get four large spools, such as crochet cotton comes on, for the end knobs E (Figs. 5 and 6). Rollers D turn on the nail pivots F (Fig. 6), which must be long enough to run through the spool knobs E, through holes C in partitions A, and half an inch into the ends of the rollers. The spools must fit tightly on the nails. Wrap nails F with paper, and then coat the paper with glue so the spools will stick fast.
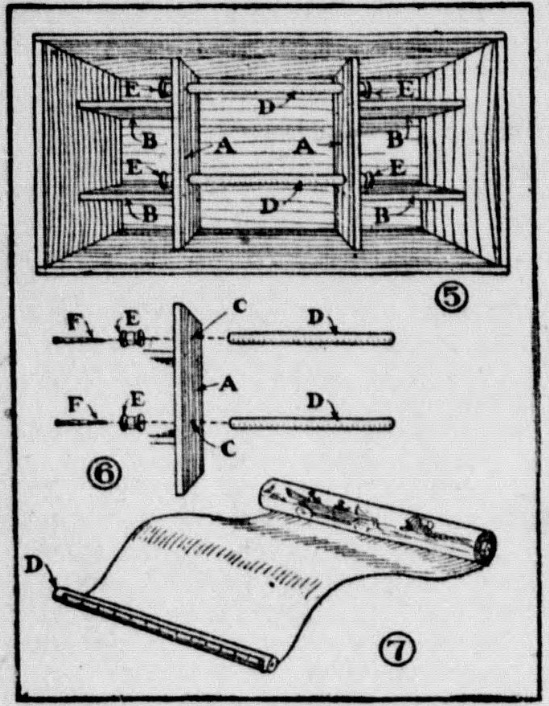
A tough wrapping paper should be used for the scroll. Perhaps you can find a store dealer who has a rolls of paper from which you can get the length you want in one piece. Tack the ends of this paper to the scroll rollers (Fig. 7). Be careful to get the paper square on the roller, so it will roll up evenly. The pictures should be put on before the scroll is pivoted in the desk. Cut out and paste these in place.
Fig. 4 shows how the box cover boards are fastened together by means of the end battens G, and how the pair of hinged are placed for hinging this drop leaf to the desk. To support the outer edge of the drop-leaf, when the desk is open, a pair of chains must be provided. Screw screw-eyes into the drop-leaf and the other side of the desk, to attach the chains to.
Putty all joints and nail holes. Then a coat of stain, or two coats of paint or white enamel, will complete the desk. By screwing a pair of screw-eyes into the top, the desk may be suspended from a picture molding; or it may be hung upon a pair of long hooks screwed into the wall.
Source: Clearwater Republican. (Orofino, Idaho), 06 July 1917.
