
The following illustrations and instructions for building a booth for a fair were originally published in 1915.
The original article talks about this project as if it were only for girls, but forget the gender talk. The booth is gender free and can be build for boys as well as adults.
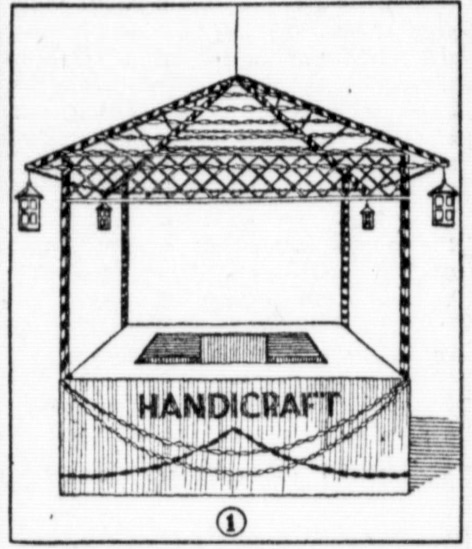
A Girls’ Handicraft Booth For A Fair
Here is a plan for a handicraft booth which a class of girls can make one of the most attractive and best patronized features of the church fair. Your own handicraft can be placed on sale, and you can build the booth itself, by following the plan I have worked out in Fig. 1.
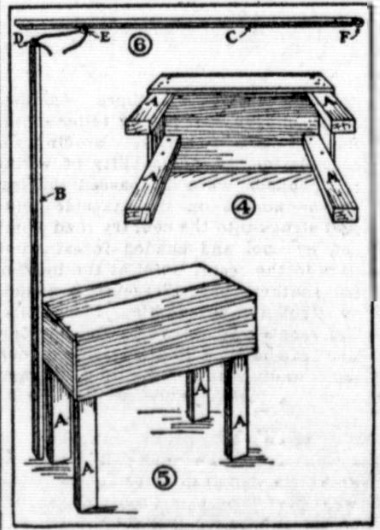
Fig. 2 shows how the booth is constructed. You will need a grocery box about thirty inches long, fourteen inches wide and ten inches deep for the corner supports. These boxes must be mounted on legs (A, Figs. 4 and 5), made of pieces two inches thick, four inches wide and twenty-six inches long. The supports for the canopy are nailed to these boxes (B, Fig. 5).
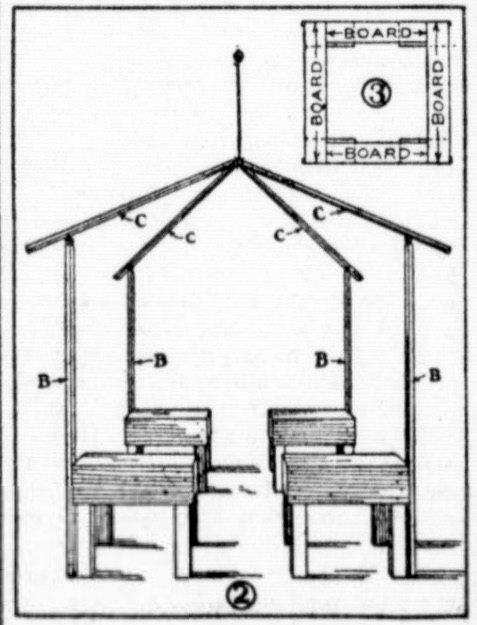
The distance apart to place the box supports will be determined, of course, by the size that you want to make the booth. Seven feet square, outside measurement, is a good size. The counter boards should be twelve inches wide, and long enough to make a continuous counter extending from corner to corner. This is not shown in Fig. 2, but it is indicated in the plan diagram of Fig. 3.
The canopy framework is made of four poles (C, Fig. 2). The lower ends of these are secured to the tops of uprights B, and the upper ends are suspended from a screw eye screwed into the ceiling directly over the tops of the booth. These poles must project six inches or so over the tops of uprights B, and be long enough to run up to a peak at the center. By screwing a screw eye into the tops of uprights B, and one into the under side of poles C (Figs. 5 and 6), the poles can be joined by tying together the screw eyes with cord. Screw a screw eye into the upper end of poles C to tie the cord to for suspending the poles from the ceiling.
Crepe tissue paper in different colors is the best covering material for the booth framework. Figure 1 suggests how strips of the paper may be wound around the corner uprights and canopy poles, how a latticework frieze of twisted ropes of crepe paper may be extended around the sides at the top, and how ribbons of crepe paper may be used to inclose the canopy framework. Pretty homemade cardboard lanterns hung from the ends of the canopy poles will add a finishing touch to the roof.
Tack heavy wrapping paper to the counter boards, and then cover this with cheesecloth of a color to harmonize with the tissue paper trimmings. A pretty effect will be obtained by plaiting this as indicated in Fig. 1. One side of the valance must be made to part, to provide an entrance into the booth.
Source: The Yale expositor. (Yale, St. Clair County, Mich.), 11 Nov. 1915.
