

Being one who enjoys Game of Thrones as well as historical fiction, when I saw this 1939 craft project for making a life sized knight in armor, I knew I had to share it. This would be the perfect summer project in preparation of Halloween. It is meant to be worn on a person, but I would use it on a life sized dummy made with duct tape. I can picture it on the porch of my new home right now. Perfect!
This Suit of Armor is Easy to Make
Cardboard Can Be Molded Into Battle Equipment of Days of Knighthood
By Byrl J. Kennedy
If you want to make something different, try constructing a suit of armor.
One of these suits, such as were worn by the knights of old, can be made quite simply, life size, from light cardboard at a cost of approximately $1.
To make my outfit I used a lightweight cardboard from the laundry wrappings around our family washing.
Besides the cardboard, you will need laths, brass paper fasteners, adhesive tape, a bit of muslin and a quart of aluminum paint. The paint cost me 70 cents, the fasteners 20 cents, and the tape and the laths together were 20 cents.
Your tools will be scissors, a hammer, a saw, and an ice-pick.
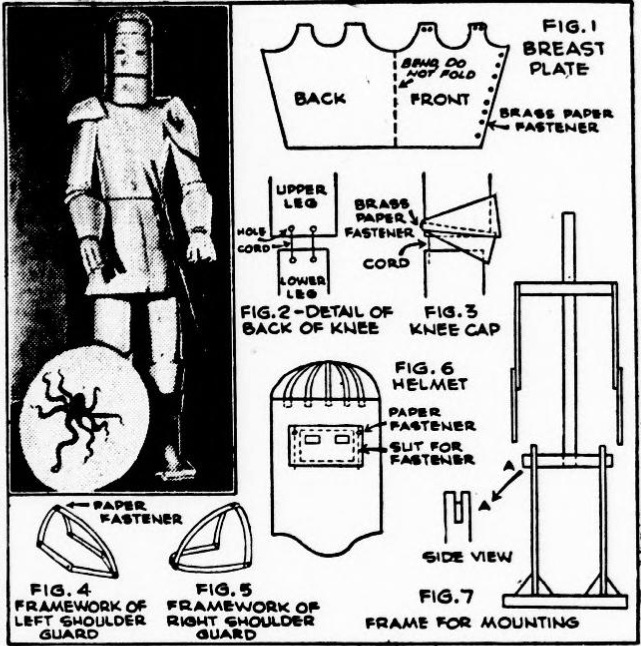
It is best to make the breastplate first. You cut this from a single piece of cardboard, just as you would cut out a sleeveless dress. Cut it so it is all in one piece (see figure in the accompanying illustration). Mold this to fit your body. Fasten the open side and shoulder together with paper fasteners so that you can wear it.
After the breastplate make the legs. Each leg consists of three sections – kneecap, thigh, and lower leg, the last two being made like cylinders.
Figure 2 shows how the two leg sections are joined together at the back of the knee by two strong waxed cords to allow freedom in walking, while figure 3 shows the kneecap, consisting of two pieces of cardboard, held to the back of the upper leg section by brass fasteners.
When worn, the legs are held up by waxed cords tied to a belt worn by the person in the armor. Be sure to get the legs big enough so that they can be slipped over your feet. To construct the arms, use the same method you used for the legs. The arms are fastened to the armor body by a cord running through the top of the upper arm and slipped around the neck of the wearer. Caps similar to the kneecaps should be made for the elbows.
The gloves are made by tracing a hand and wrist on a flat piece of cardboard. Cut this out and fasten the wrist to the arm with paper fasteners. Next, make 28 small cylinders, about an inch long, using three of these to make each finger and two for each thumb. Wrap tape around the cylinders to hold the section together. Slip the jointed finger cylinders over the cardboard fingers of the cutout hand and glue them so the wearer can slip his fingers into them.
A gauntlet is made by cutting out a cardboard strip big enough to fit around the wrist. It should flare out at the top.
To construct the skirt, cut strips of cardboard extending from the waist to the center of your upper leg. (These strips should be wider at the bottom than at the top.) Hold the strips together by means of a waistband, which is in turn fastened to the bottom of the breastplate. Pin the strips together with brass fasteners.
Now construct the left shoulder and armpit guards by making a latticework of cardboard strips. Mold it to cover the shoulder, extending it a bit in front and back so that it comes down to the armpits (figure 4). Attach to the breastplate with paper fasteners, which will act as hinges and give the arm plenty of freedom. Cover the cardboard latticework with muslin and paint it like the rest of the armor. When painted, the muslin stiffens.
The right shoulder guard is made in the same way, but its frame is smaller and covers just the shoulder, so as not to interfere with the lance (figure 5).
The helmet is made by fitting a wide piece of cardboard around the head and making it into a cylinder. The bottom of this cylindrical helmet must be fitted firmly over the top or neck of the breastplate. The helmet top is made by gluing strips of cardboard in a netlike fashion, rounding the top out slightly.
The helmet must now have a face. Cut out from behind the helmet a rectangular piece of cardboard so that the wearer’s face may be seen. One inch from the sides of this hole, make vertical slits, extending them about one-half inch below the cut out section.
From your supply of cardboard, cut a piece slightly larger than the hole in the helmet. Place paper fasteners at the two upper corners of this piece and insert the fasteners into the two slits in the helmet, so that the mouth and nose piece can slide up and down, the wearer being able to mask himself completely. Last of all, cut two holes for the eyes (fig. 6).
Now the suit can be mounted on a framework of laths with a heavy wooden base. Build the frame so that the middle of it can be removed, allowing the armor legs to be slipped on and off (fig. 7).
The lance, sword, and shield will complete your armor suit. Make a lance by nailing two broomsticks together and shaving the end of one to a long, fine point [child safety was not a priority back in those days, apparently]. Prepare a disk of cardboard, 19 inches in diameter, and put the lance through its center, arranging the disk about three feet from the head of the lance.
A sword made from a lath is fastened to the armor suit’s waist by a cardboard loop.
The round shield, 2-1/2 feet in diameter, is made of cardboard also. So that the knight can slip it on his arm, fasten large loops of cardboard to the inside of the shield. Paint a coat-of-arms on the other side.
Apply two coats of aluminum paint to give the armor a shiny metallic finish. The cardboard will absorb most of the first coat.
The armor not only makes a fine costume for a masquerade party, but will be an impressive sight standing in the corner of your room.
Source: Evening star. (Washington, D.C.), 01 Jan. 1939.
